
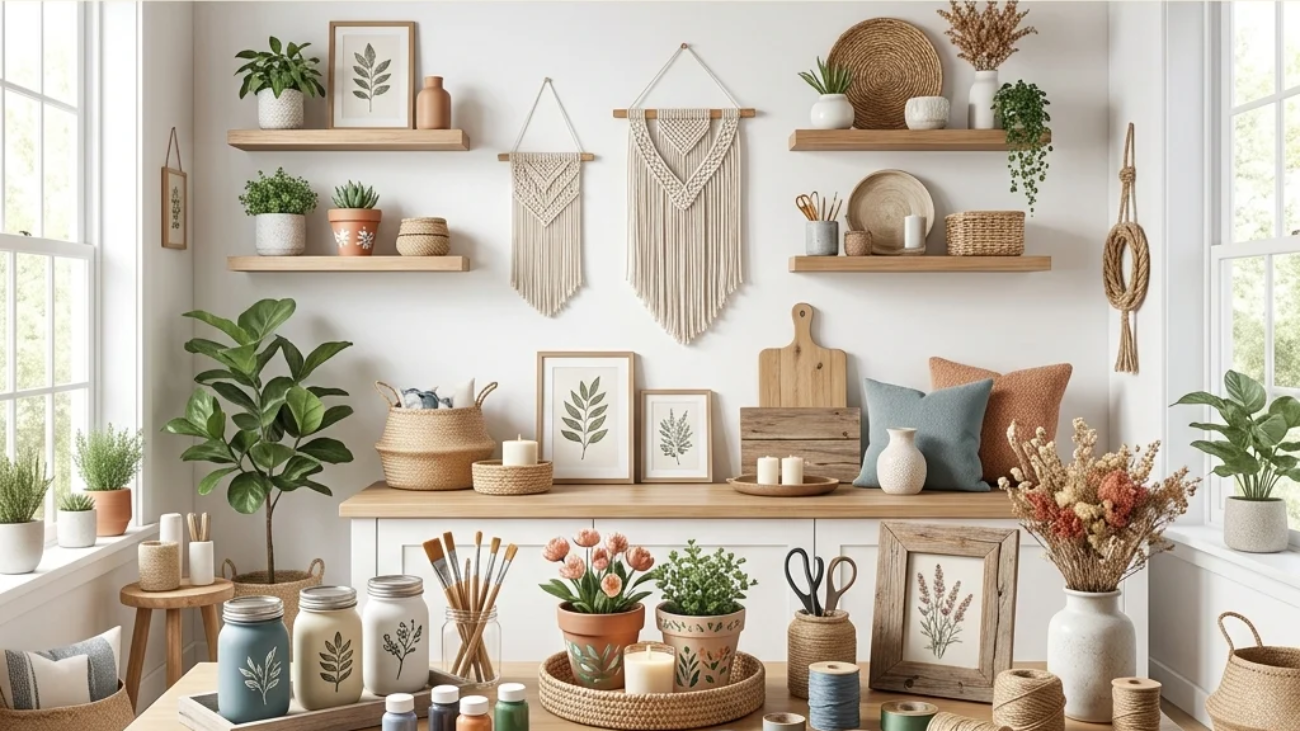
DIY home decor is the practice of designing, building, or transforming decor pieces yourself using affordable materials and basic tools, rather than buying everything finished off a shelf. This article gives you 20 real, buildable DIY home decor ideas spanning color, material, lighting, furniture, and layout, each one a project you can start this weekend with supplies from a hardware store or Amazon cart.
The feel is unmistakable: paint-stained hands, the specific satisfaction of a shelf you leveled and mounted yourself, a room that carries your actual choices instead of a showroom’s. DIY decorating rewards patience and a little mess in exchange for something no catalog page can offer: a home genuinely made by the person living in it. Here are 20 ideas worth saving and stealing.
Why DIY Home Decor Works So Well
DIY home decor traces back further than Pinterest boards; it draws on the Arts and Crafts movement of the late 1800s, which prized handmade objects over factory-made ones, and the “make do and mend” resourcefulness of the WWII home front, where materials shortages forced households to repurpose what they already had. What makes it distinct from any single design style is that it’s a method, not an aesthetic. A DIY project can be rustic, modern, or maximalist, depending entirely on the materials and colors you choose, which is why it works inside almost any existing room.
The materials that show up most across DIY projects are ones that are forgiving and widely available: reclaimed or unfinished pine and birch plywood, canvas drop cloth, cotton macrame cord, air-dry or quick-set concrete mix, and craft paints like DecoArt or Rust-Oleum’s chalk and spray finishes. Colors tend to follow whatever the room already leans toward, though warm neutral, such as greige, warm white, and terracotta, paired with one confident DIY accent color, are the most common combination, since a single bold hue is easier to control in a hand-painted project than a full palette.
DIY home decor has surged specifically because two pressures are hitting households at once: rising furniture costs are pushing people toward making rather than buying, and short-form video tutorials on TikTok and Pinterest have made techniques that once required a class, such as reupholstery, concrete casting, and macrame knotting, learnable in a ten-minute watch. Search interest in “DIY home decor” has climbed steadily on Pinterest for exactly this reason: it’s now genuinely easier to learn the skill than it was even five years ago.
Style at a Glance
| Element | No-Tool & No-Sew Projects | Basic-Tool Builder Projects |
| Philosophy | Fast, low-risk, fully reversible | Custom-built, requires drill or saw |
| Materials | Paint, fabric remnants, rope, adhesive | Reclaimed wood, plywood, and concrete mix |
| Color Palette | Warm white, terracotta, sage accent | Natural wood tone, matte black, greige |
20 DIY Home Decor Ideas
1. DIY Color-Blocked Accent Wall With Painter’s Tape
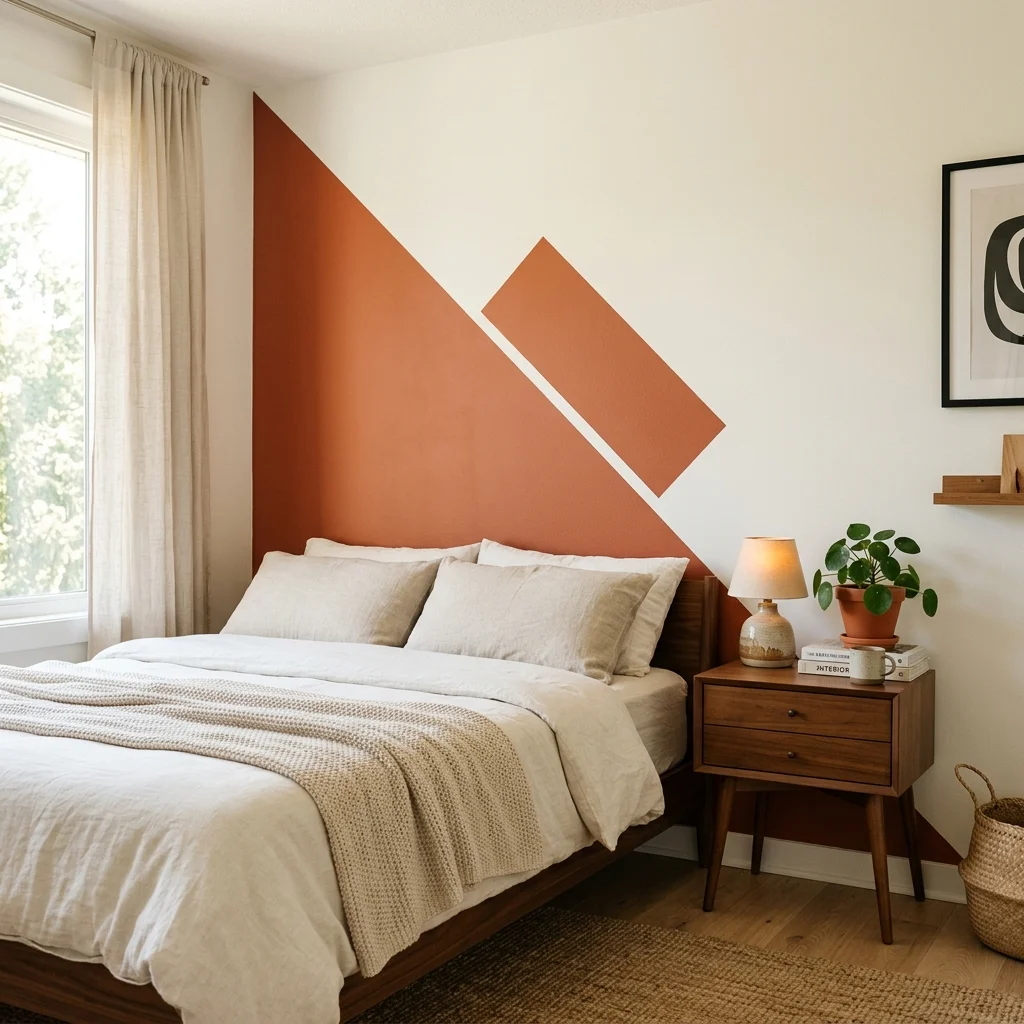
Vibe: The wall feels playful, one confident shape doing all the work.
Why it works: Color blocking uses a single geometric shape, an arch, a rectangle, a soft-edged circle, painted directly onto an existing wall color, which creates a bold focal point without the commitment or cost of painting an entire wall or room. The crisp edge line, achieved with painter’s tape, is what separates a professional-looking result from a smudged one, since the taped boundary is doing the precision work a freehand brush never could.
How to get it: Sketch your shape lightly in pencil first, apply painter’s tape (Frog Tape holds the cleanest line) along the outline, and press the tape edge firmly with a plastic scraper before painting to prevent bleed-through underneath it.
💡 Quick Win: A simple arch shape, roughly headboard-width and starting at the floor, is the easiest color-blocking form for a first attempt, with no complex angles to tape.
Shop the Look
| Product |
| Frog tape painter’s tape, sharp edge |
| Terracotta interior sample paint |
| Angled paintbrush set |
| Plastic putty scraper |
| Drop cloth canvas sheet |
2. DIY Reclaimed Wood Floating Shelves
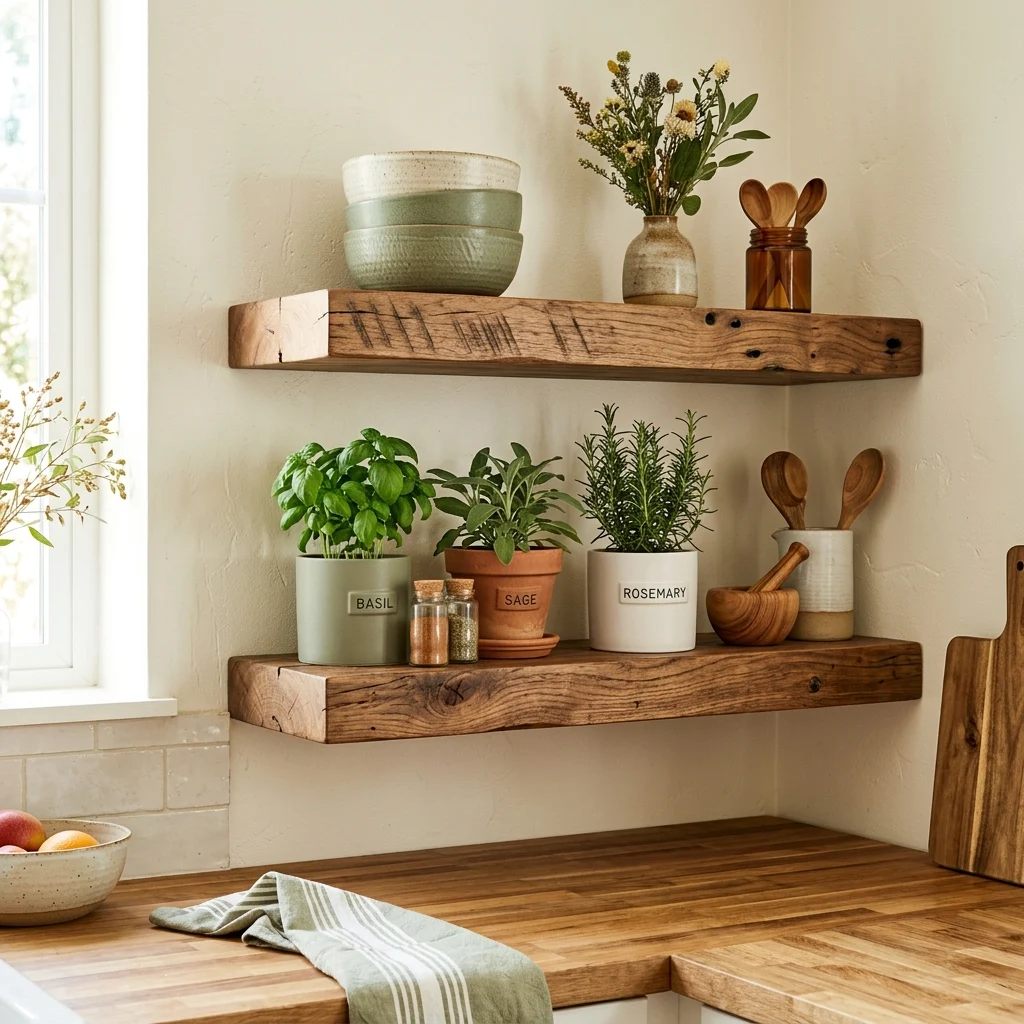
Vibe: The shelves feel handmade, wood grain telling you exactly where they came from.
Why it works: Floating shelves rely on a hidden internal bracket system rather than visible supports, which is what gives them their signature “floating” look. The wood plank simply slides over a steel rod anchored into wall studs. Using reclaimed or salvaged wood instead of new pine adds visible grain, saw marks, and color variation that a uniform store-bought shelf can’t offer, turning a functional storage piece into a genuine handmade object.
How to get it: Locate wall studs with a stud finder before mounting the bracket rod, since floating shelves rely entirely on stud anchoring for weight support. Mounting into drywall alone will fail under any real load.
Shop the Look
| Product |
| Hidden floating shelf bracket kit |
| Reclaimed wood plank, unfinished |
| Stud finder tool |
| Wood conditioner and sealant |
| Ceramic kitchen bowl set |
3. DIY Painted Mason Jar Pendant Lights
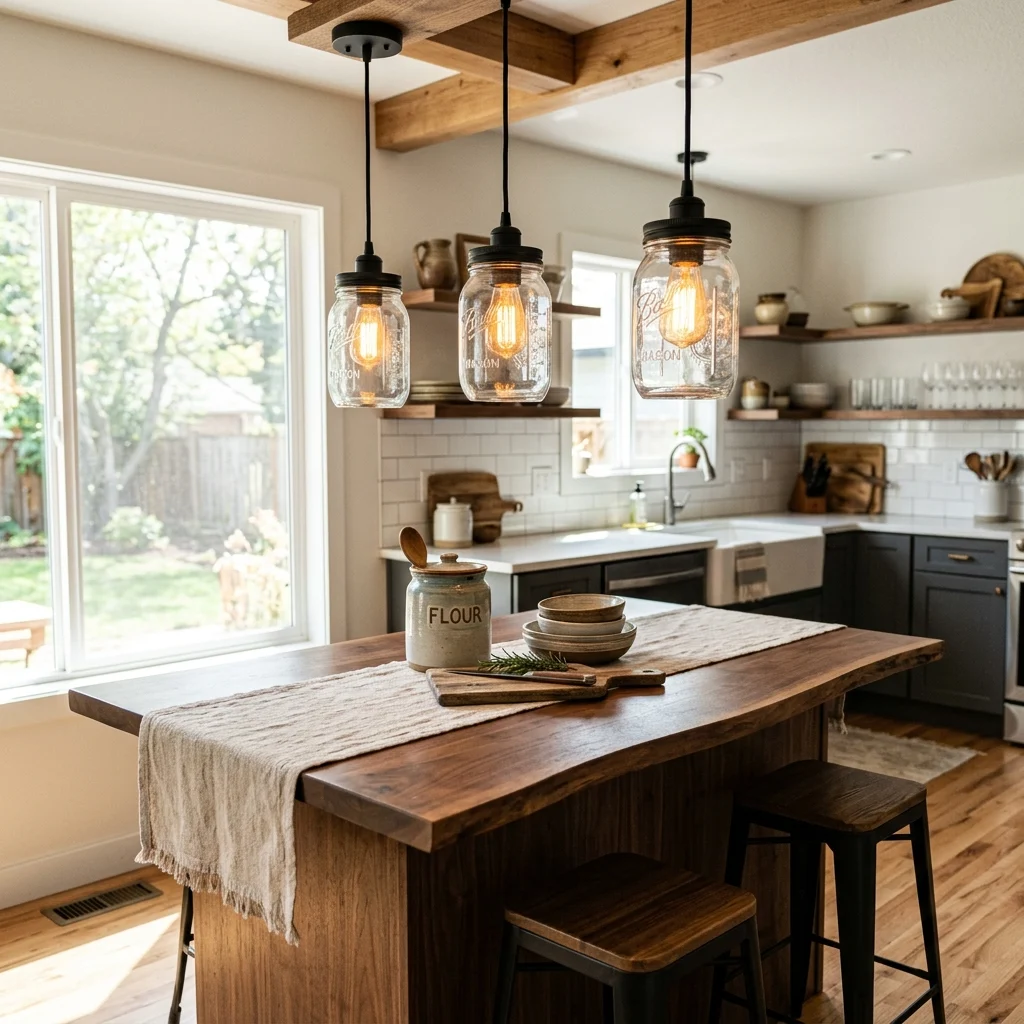
Vibe: The island feels warm, glass jars glowing like something from a farmhouse kitchen.
Why it works: Converting mason jars into pendant lights uses an inexpensive pendant light conversion kit, a socket, and a cord that threads through a hole drilled in the jar’s metal lid, which means the fixture cost is a fraction of a store-bought glass pendant while keeping the same warm, diffused glow that glass shades produce. Painting the exterior metal lid matte black before assembly, rather than leaving it raw, gives the finished fixture a more intentional, less craft-fair look.
How to get it: Drill the lid hole with a step-bit drill attachment sized to your cord kit before painting, then thread the pendant cord through, screw in a warm-toned bulb, and hang using the kit’s provided ceiling canopy.
💡 Quick Win: Buy a pendant light conversion kit that already includes the drilled lid template, which removes the trickiest step for first-time DIYers.
Shop the Look
| Product |
| Mason jar pendant light conversion kit |
| Wide-mouth glass mason jars, set of three |
| Matte black spray paint, metal-safe |
| Warm white Edison-style bulb set |
| Step-bit drill attachment |
4. DIY Pallet Wood Coffee Table
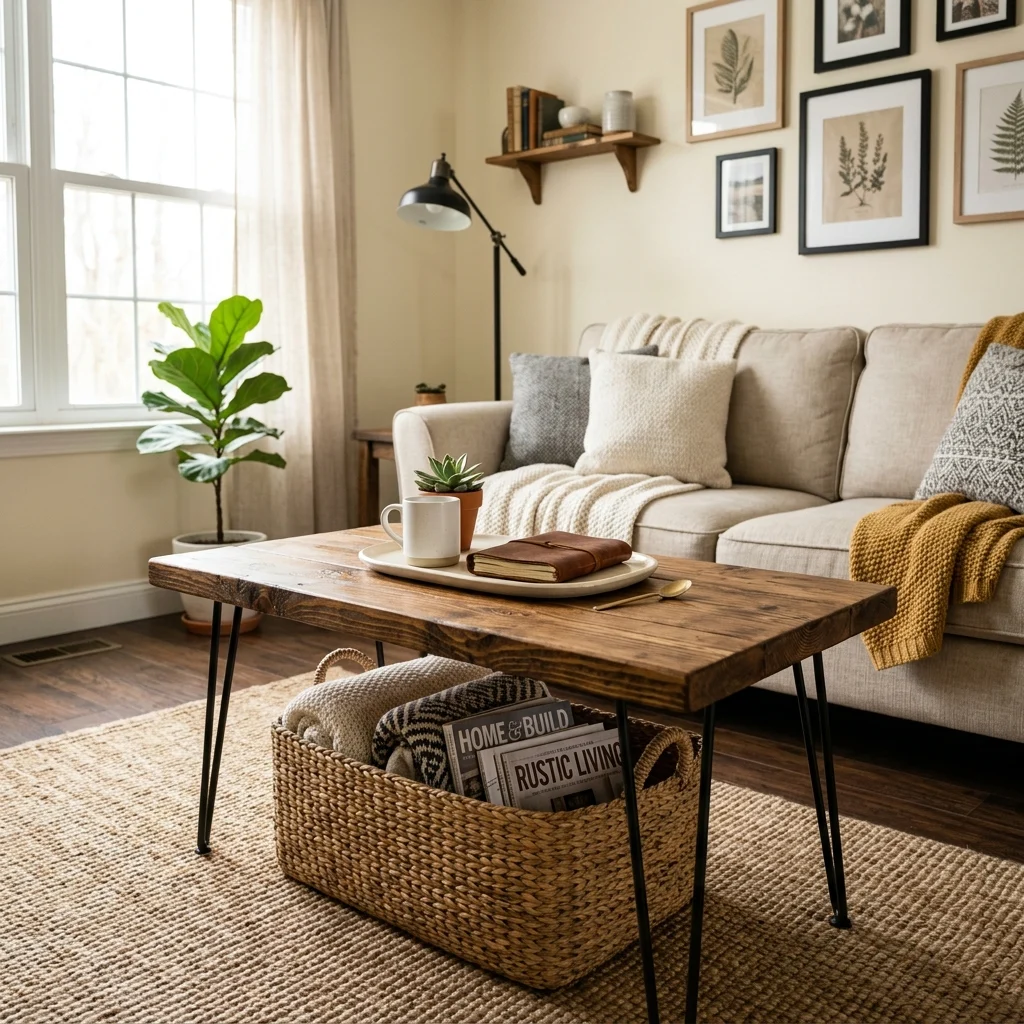
Vibe: The table feels rustic, built rather than bought.
Why it works: A pallet-wood coffee table works because pallet slats are already cut to a consistent, workable width and thickness, meaning the build is largely assembly and finishing rather than complex cutting, sanding the rough surface smooth, staining it evenly, and attaching hairpin legs to a plywood-backed frame. The visible plank seams and grain variation are what read as handmade rather than mass-produced, so sanding too aggressively actually works against the intended look.
How to get it: Sand only enough to remove splinters and rough texture, not the wood’s natural grain pattern, then apply a walnut or English oak wood stain in two thin coats rather than one heavy one for the most even color absorption.
Shop the Look
| Product |
| Hairpin table leg set, four-pack |
| Walnut wood stain, oil-based |
| Orbital sander with fine-grit pads |
| Wood glue, exterior-grade |
| Woven storage basket, low profile |
5. DIY Gallery Wall With Free Printable Art
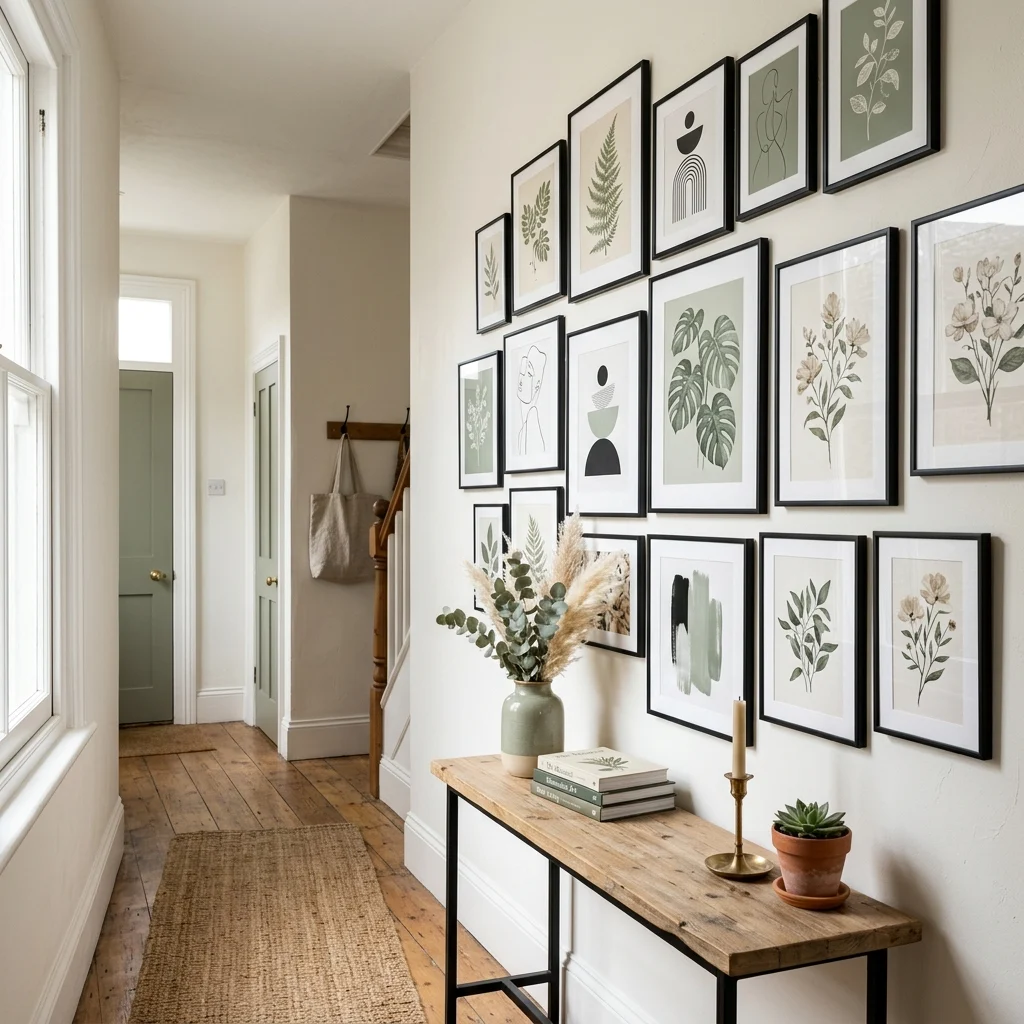
Vibe: The wall feels personal, curated without a single item purchased, ready-framed.
Why it works: Printable, high-resolution files downloaded and printed at home or at a local print shop removes the single biggest cost barrier to a gallery wall, since framed original art can run hundreds of dollars per piece while a printable download costs a few dollars and can be reprinted at any size. Using matching frame styles across varied print subjects is the technique that keeps a free-source gallery wall from looking mismatched, since consistent framing does the visual unifying work that the art itself doesn’t.
How to get it: Choose one frame color and finish (thin black or natural wood) across every piece, and lay the arrangement out on the floor first using painter’s tape as a placement guide before committing to any wall holes.
💡 Quick Win: Local print shops can output a high-resolution digital file on quality matte paper for just a few dollars per print, often same-day.
Shop the Look
| Product |
| Thin black picture frame set, mixed sizes |
| Botanical printable art bundle |
| Abstract line art printable set |
| Painter’s tape for layout planning |
| Small console table |
6. DIY Ombre Dip-Dyed Curtains
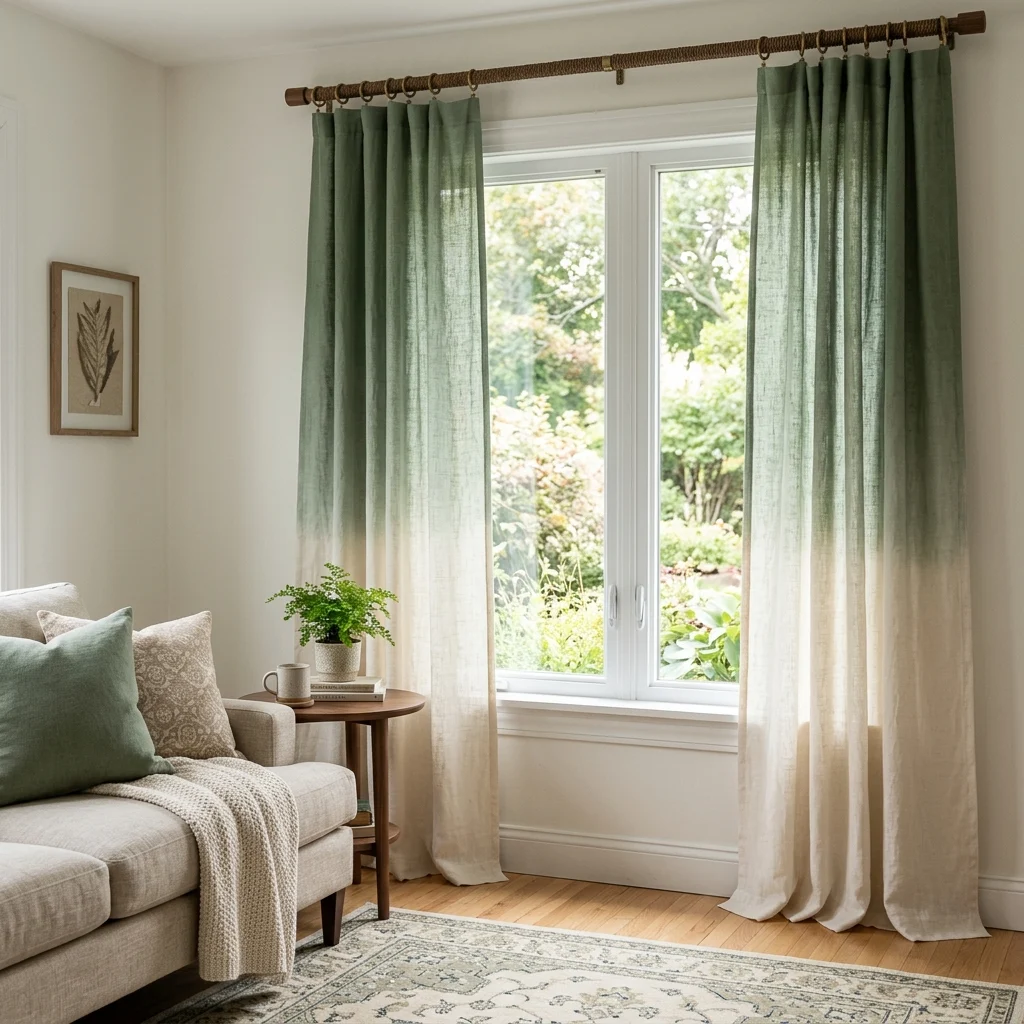
Vibe: The curtains feel soft, color fading like watercolor down the fabric.
Why it works: Dip-dyeing works by submerging only the bottom portion of a fabric panel into dye and gradually lifting it out, which creates a soft gradient because the fabric fibers absorb less dye the longer they’ve been out of the bath, a controlled version of the same principle behind natural fabric fading. Natural fiber fabrics like linen or cotton take dye far more evenly than synthetic blends, which is why sourcing the correct base curtain material matters more in this project than the dyeing technique itself.
How to get it: Use 100% cotton or linen curtain panels (synthetic blends resist dye and produce blotchy results), submerge the bottom third in fabric dye for two minutes, then dip progressively shorter intervals moving upward to build the gradient before rinsing thoroughly.
Shop the Look
| Product |
| Natural linen curtain panel, undyed |
| Fabric dye, sage green |
| Rubber dyeing gloves |
| Large plastic dye basin |
| Woven wood curtain rod |
7. DIY Macrame Wall Hanging
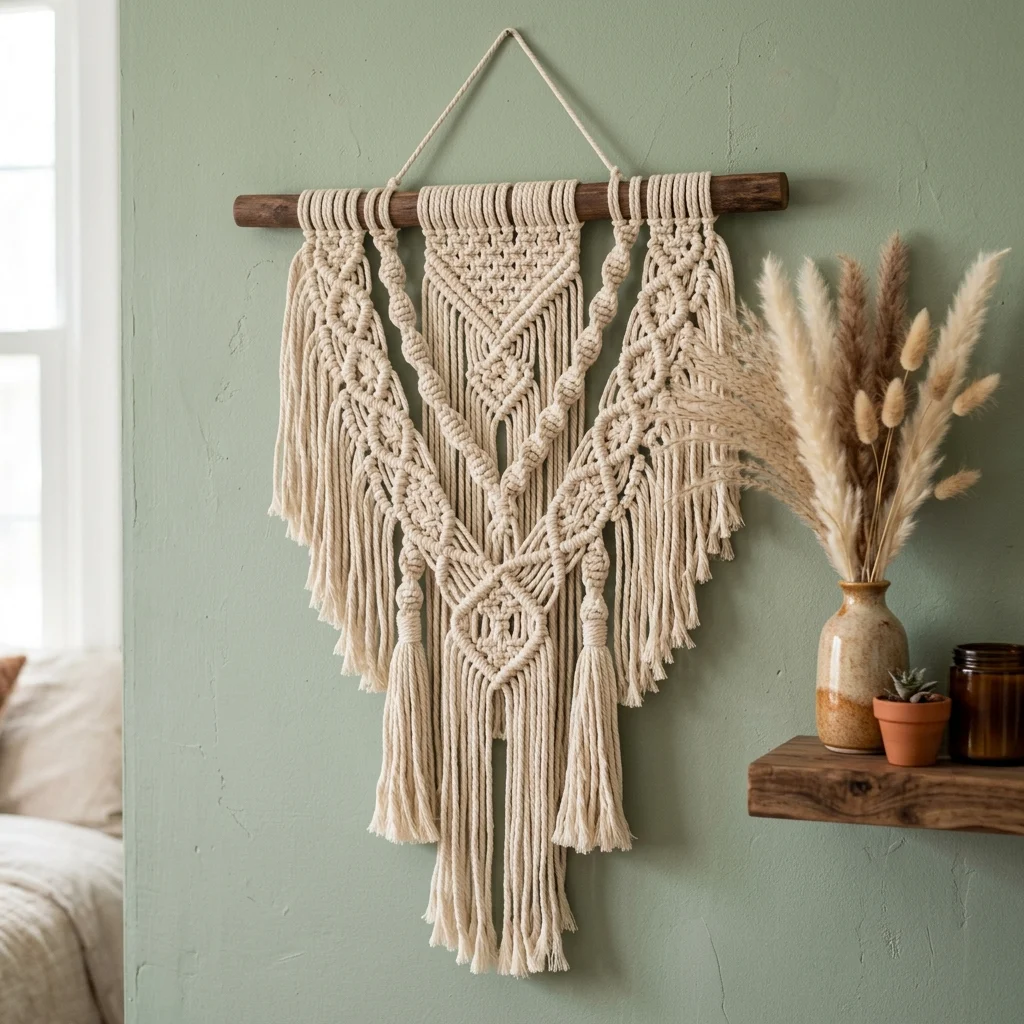
Vibe: The wall feels textured, knots catching light and shadow across the cord.
Why it works: Macrame uses only knotting, no glue, sewing, or tools beyond scissors to build a three-dimensional textile piece entirely from repeated pattern, which is why it’s remained one of the most accessible DIY crafts since its 1970s popularity peak. The technique’s visual interest comes specifically from shadow: raised knots cast small shadows against the flat wall behind them, adding a texture layer no flat printed textile can replicate.
How to get it: Learn the two foundational knots, the square knot and the half hitch, since roughly 90% of beginner macrame patterns use only these two in repetition, and mount the finished piece on a natural wood dowel rather than a metal rod for a warmer, more cohesive look.
💡 Quick Win: A simple fringe-style hanging using only overhand knots and cut cord ends is achievable in under an hour with zero prior macrame experience.
Shop the Look
| Product |
| Natural cotton macrame cord, 4mm |
| Unfinished wood dowel, 12-inch |
| Macrame comb for fringe styling |
| Dried pampas grass stems |
| Wall-mount hooks for hanging |
8. DIY Room Divider From Curtain Rods and Fabric
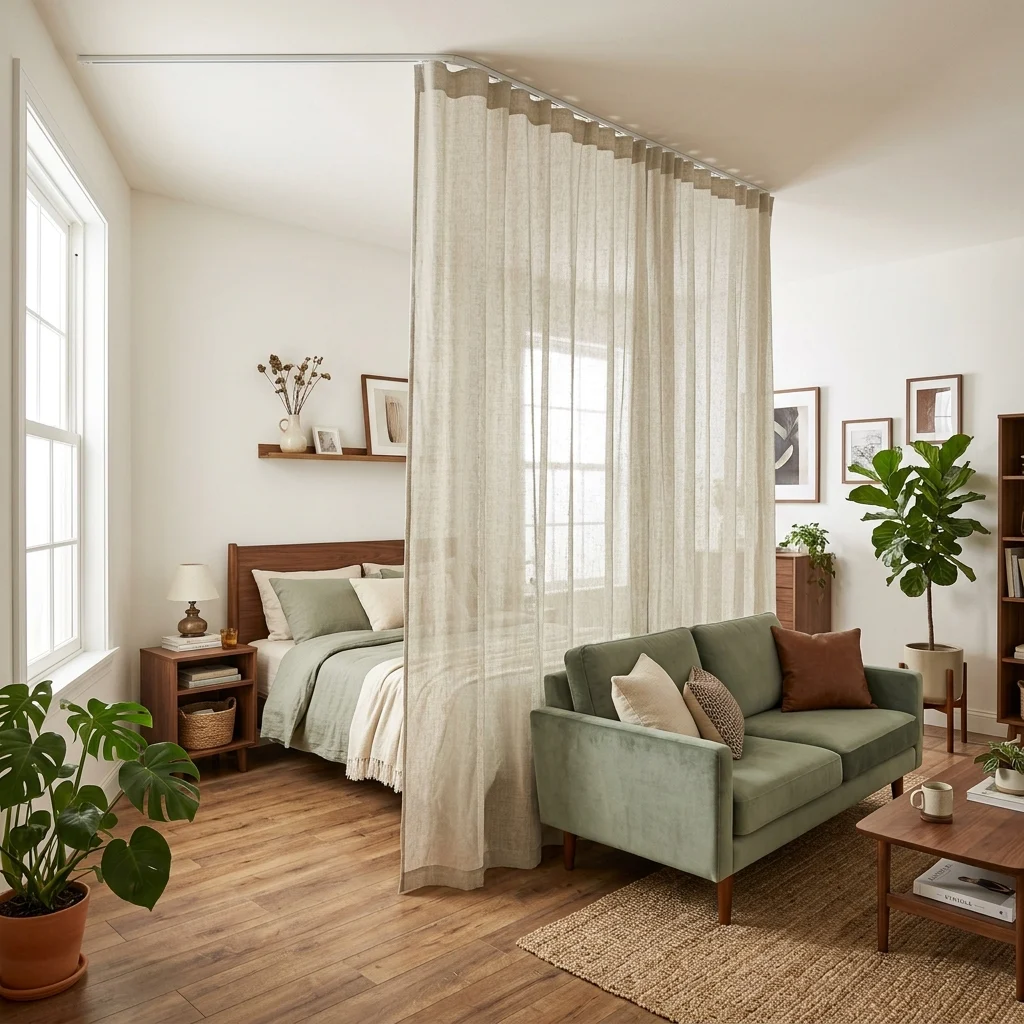
Vibe: The studio feels zoned, one fabric panel doing the job of a wall.
Why it works: A ceiling-mounted curtain track with a full-length fabric panel creates the same soft-zoning effect that built-in walls achieve, a defined boundary between two functions without any construction, drilling into load-bearing structures, or loss of security deposit in a rental. Because the fabric panel can be drawn back entirely, this divider also stays flexible in a way a fixed partition wall never could, opening the full room back up whenever needed.
How to get it: Mount a ceiling track (not a wall-to-wall tension rod, which sags under fabric weight over time) using anchors rated for your ceiling material, and choose a mid-weight linen rather than sheer voile if privacy is the goal rather than just visual separation.
Shop the Look
| Product |
| Ceiling-mount curtain track, bendable |
| Mid-weight linen curtain panel, extra long |
| Ceiling anchor hardware kit |
| Curtain rings with clips |
| Artificial floor plant, tall |
9. DIY Fold-Down Wall Desk for Tiny Rooms
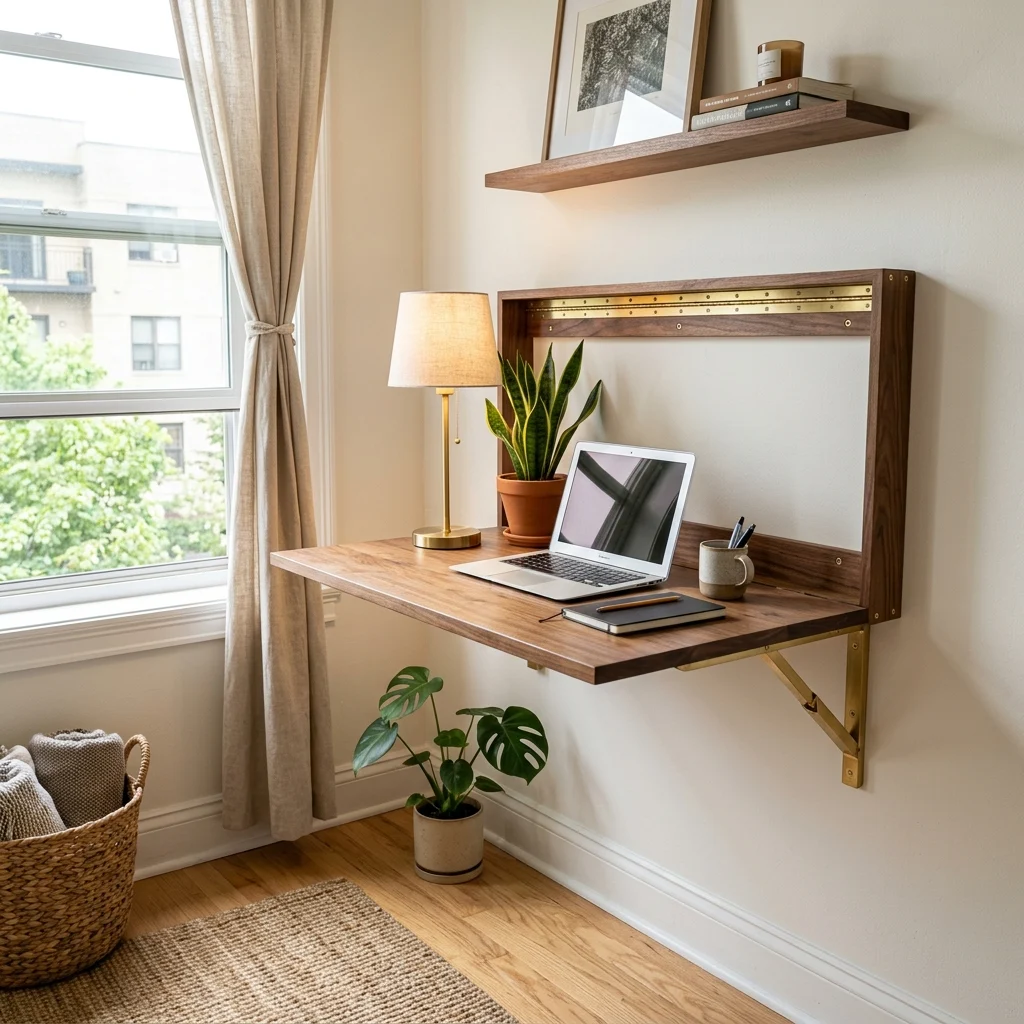
Vibe: The corner feels efficient, a full desk that disappears when it’s not needed.
Why it works: A fold-down desk uses a piano hinge, a single continuous hinge running the full width of the desktop mounted directly to a wall stud, paired with a folding support bracket beneath, which lets the desktop swing flush against the wall when not in use. This solves the specific small-space problem a standard desk can’t: reclaiming the floor footprint entirely rather than just minimizing it, since a folded desk occupies roughly four inches of wall depth instead of two feet of floor space.
How to get it: Mount the piano hinge into wall studs (not drywall anchors alone) since the desk needs to support real working weight when open, and choose a folding support bracket rated for at least 50 pounds for stability.
Shop the Look
| Product |
| Piano hinge, full-length |
| Folding desk support bracket |
| Plywood desktop panel, pre-cut |
| Wall stud finder tool |
| Compact brass desk lamp |
10. DIY Reupholstered Thrift Store Chair
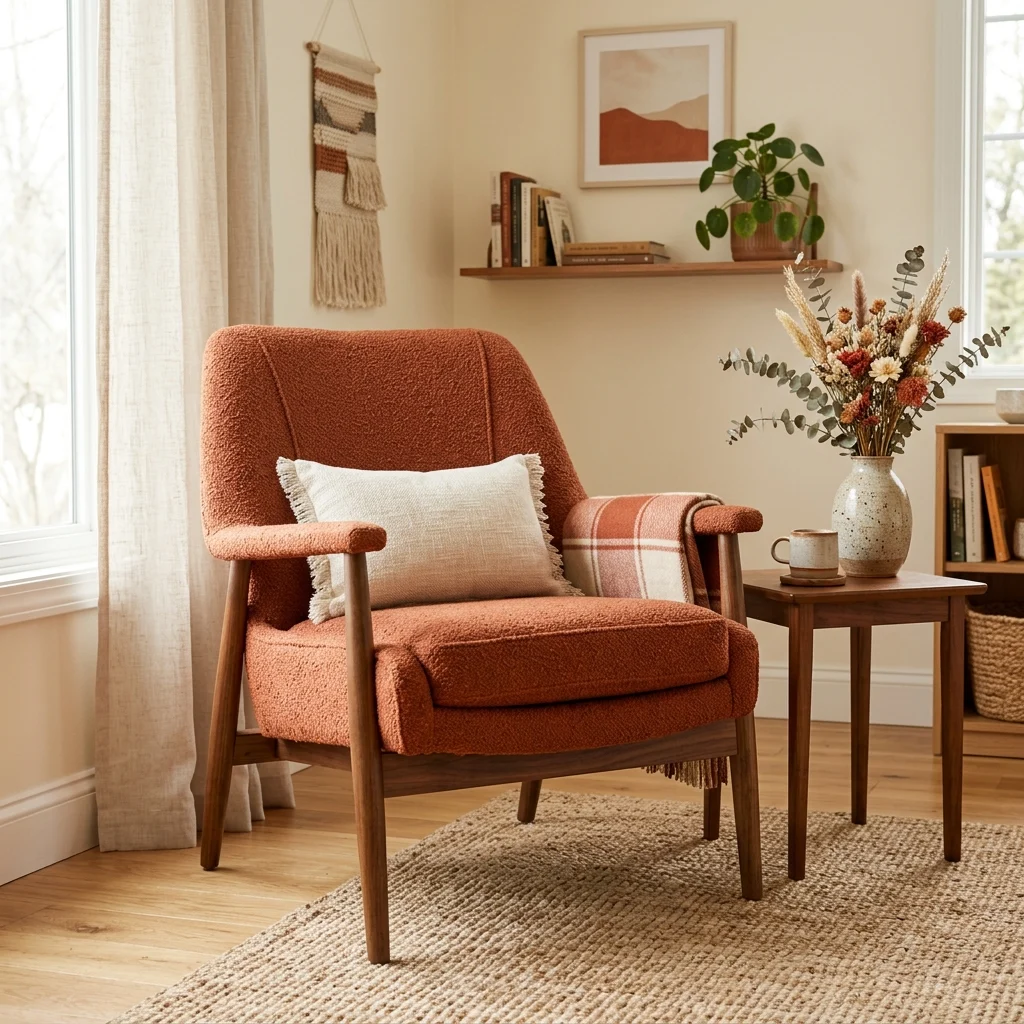
Vibe: The chair feels transformed, its old shape wearing an entirely new surface.
Why it works: Reupholstering a thrift-store chair with sound bones but dated or worn fabric replaces only the outer layer of fabric and often the foam padding while keeping the frame’s original joinery and structure intact, which is both cheaper and more sustainable than buying new furniture built to imitate the same silhouette. A staple gun mounted fabric, pulled taut and stapled underneath the seat frame where it’s hidden from view, is the core technique that separates a clean reupholstery job from a lumpy one.
How to get it: Remove the old fabric piece by piece and use each panel as a cutting template for the new fabric, pulling each new panel taut before stapling so wrinkles don’t set once the fabric is fully secured.
💡 Quick Win: A simple drop-in seat cushion (common on dining chairs) can be reupholstered in under 30 minutes with just a staple gun and new fabric, no frame disassembly required.
Shop the Look
| Product |
| Terracotta boucle upholstery fabric |
| Heavy-duty staple gun |
| Upholstery foam padding sheet |
| Fabric scissors, sharp |
| Flathead staple remover tool |
11. DIY Rope-Wrapped Floor Lamp
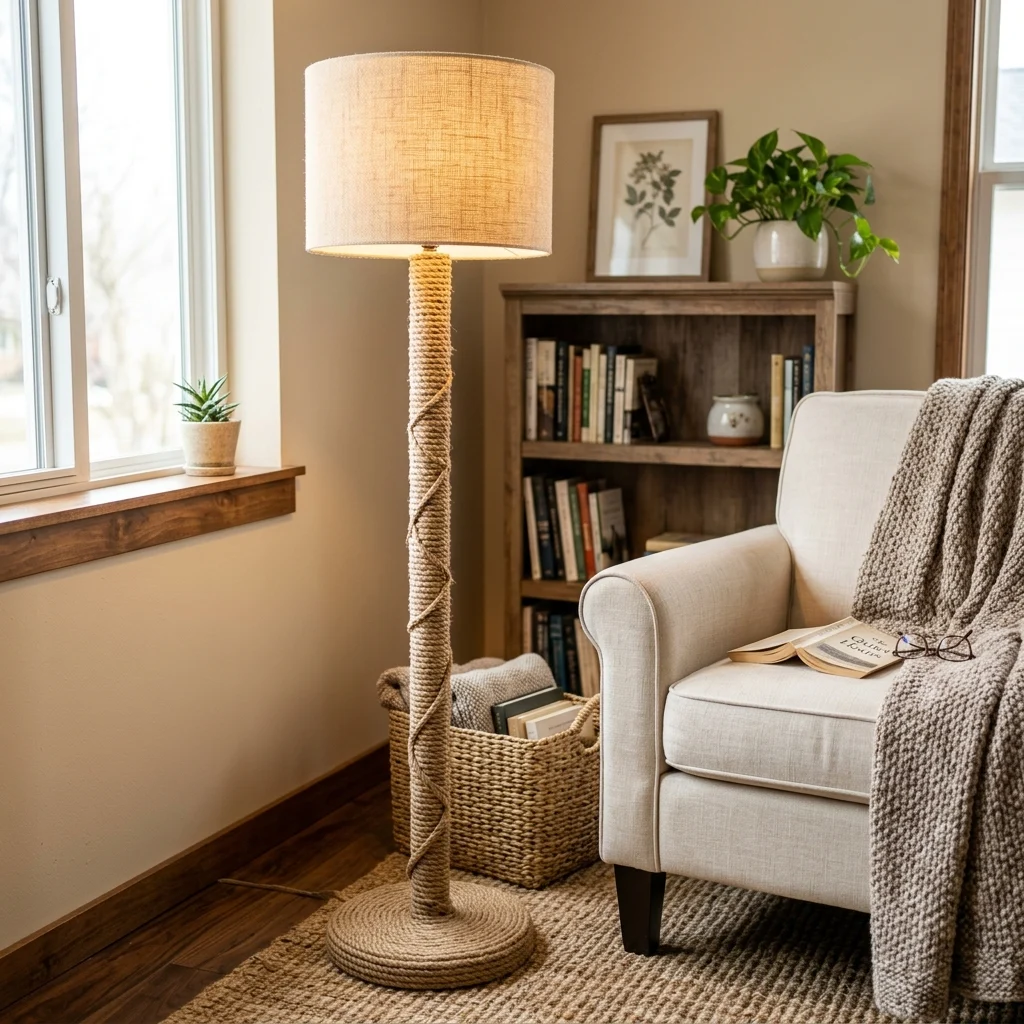
Vibe: The lamp feels tactile, with texture wrapped from base to nearly the shade.
Why it works: Wrapping a plain metal or plastic lamp pole in natural jute or manila rope, secured with hot glue at intervals, disguises a builder-grade fixture entirely while adding genuine dimensional texture that a smooth pole never had. The same visual logic behind texture layering elsewhere in decorating is applied to a functional object most people otherwise overlook. Because the technique only alters the surface, it works on nearly any existing lamp base regardless of its original finish or condition.
How to get it: Apply hot glue in short sections rather than along the whole pole at once, wrapping the rope tightly and pressing each coil against the previous one before the glue sets, so there are no visible gaps in the finished wrap.
Shop the Look
| Product |
| Natural jute rope, thick gauge |
| Hot glue gun with glue sticks |
| Linen drum lamp shade |
| Existing floor lamp base, any style |
| Warm white dimmable bulb |
12. DIY Concrete Planters From Household Molds
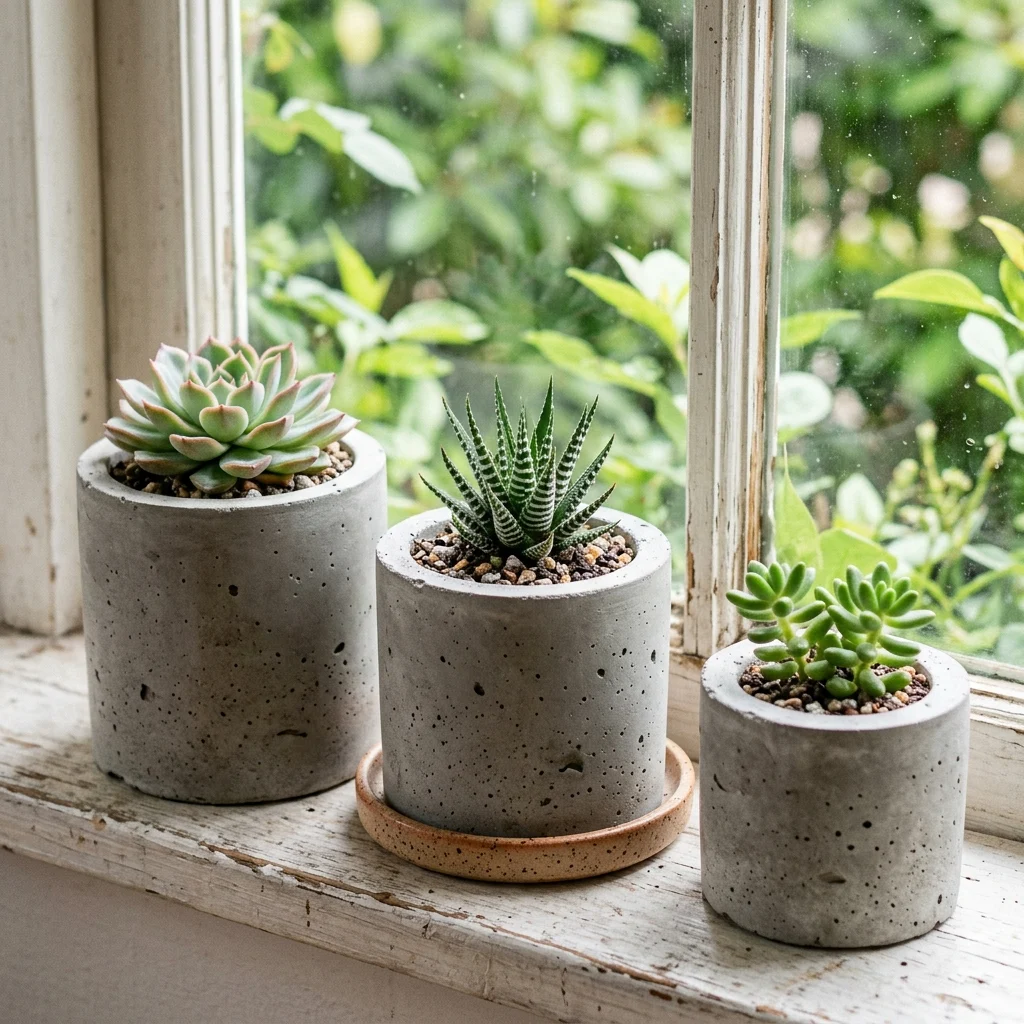
Vibe: The windowsill feels raw, concrete’s plain honesty next to green plant life.
Why it works: Casting concrete planters using ordinary household containers, a yogurt tub as the outer mold, and a smaller cup as the inner cavity turns quick-set concrete mix into custom-sized planters at a fraction of the cost of store-bought concrete pots, which typically carry a heavy material markup. The rough, slightly imperfect surface texture that comes from a DIY pour, including small air bubbles, is part of what reads as handmade rather than factory-cast, so over-sanding the cured piece removes the very quality that makes it interesting.
How to get it: Grease the inside of both molds with cooking oil before pouring so the cured concrete releases cleanly, and tap the filled mold gently on a table several times after pouring to release trapped air bubbles before it sets.
Shop the Look
| Product |
| Quick-set concrete mix, small bag |
| Plastic mixing container |
| Small succulent plant set |
| Ceramic drainage saucer set |
| Concrete sealant spray |
13. DIY No-Sew Throw Pillow Covers
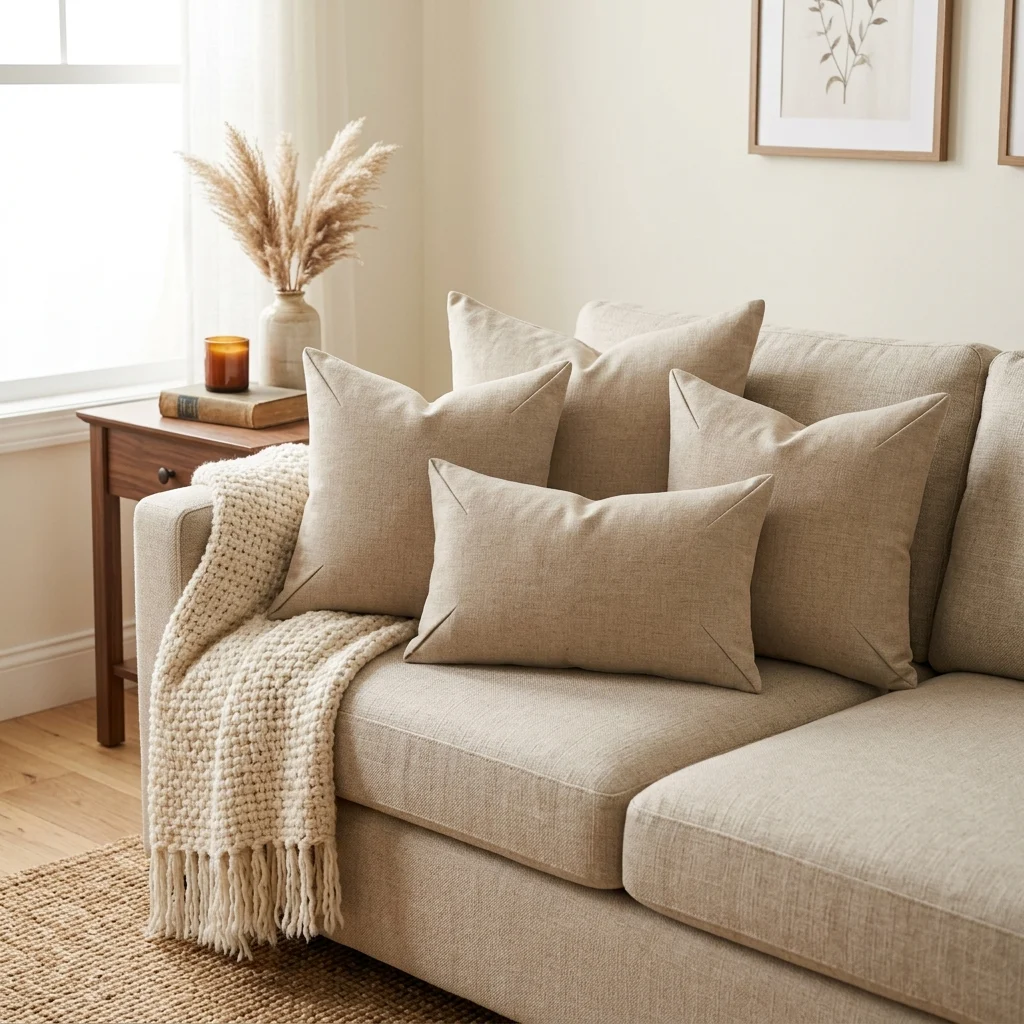
Vibe: The sofa feels cozy, texture layered without a single stitch.
Why it works: No-sew pillow covers use fabric glue or hem tape instead of a sewing machine to secure fabric edges, folding a single flat fabric piece around an existing pillow insert envelope-style so the seam sits hidden at the back. This makes the project accessible to anyone without sewing skills or equipment, while still producing a genuinely custom-fit cover rather than a generic store-bought size.
How to get it: Measure your pillow insert and cut fabric roughly two inches larger on all sides than needed, fold the raw edges under before gluing so no fraying edge is visible, and press each glued seam flat with a book or heavy object while it sets.
💡 Quick Win: Fabric glue sets in under 30 minutes, making this genuinely a same-afternoon project from fabric store to finished sofa styling.
Shop the Look
| Product |
| Oatmeal linen fabric, one yard |
| No-sew fabric glue |
| Pillow inserts, standard size |
| Fabric scissors |
| Fabric measuring tape |
14. DIY Chalk Paint Furniture Makeover
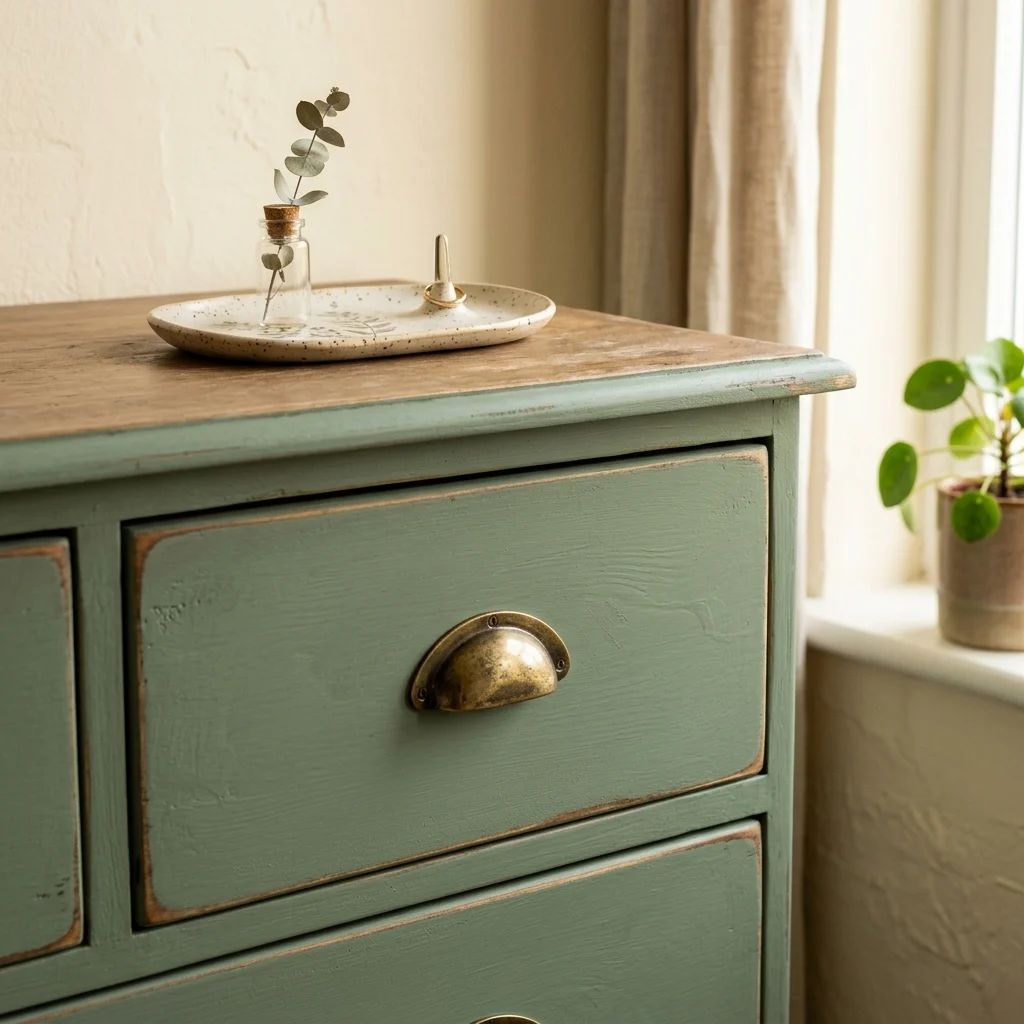
Vibe: The dresser feels refreshed, one color change carrying an entire piece.
Why it works: Chalk paint adheres directly to most furniture surfaces without sanding or priming first, which is what makes it the default choice for beginner furniture makeovers. The flat, matte finish also naturally shows brush strokes in a way that reads as intentional rather than sloppy, unlike glossier paints that highlight every imperfection. Lightly sanding just the edges and corners after the paint dries reveals a hint of the wood or original color beneath, mimicking natural wear without the unpredictability of genuine age.
How to get it: Clean the furniture surface thoroughly before painting (chalk paint’s main enemy is dust and grease, not lack of primer), apply two thin coats rather than one thick one, and finish with a clear wax topcoat to protect the matte surface from scuffing.
Shop the Look
| Product |
| Sage green chalk paint, quart |
| Clear furniture wax topcoat |
| Chalk paint brush, natural bristle |
| Fine-grit sanding sponge |
| Brushed brass drawer pull set |
15. DIY Under-Bed Storage Zone
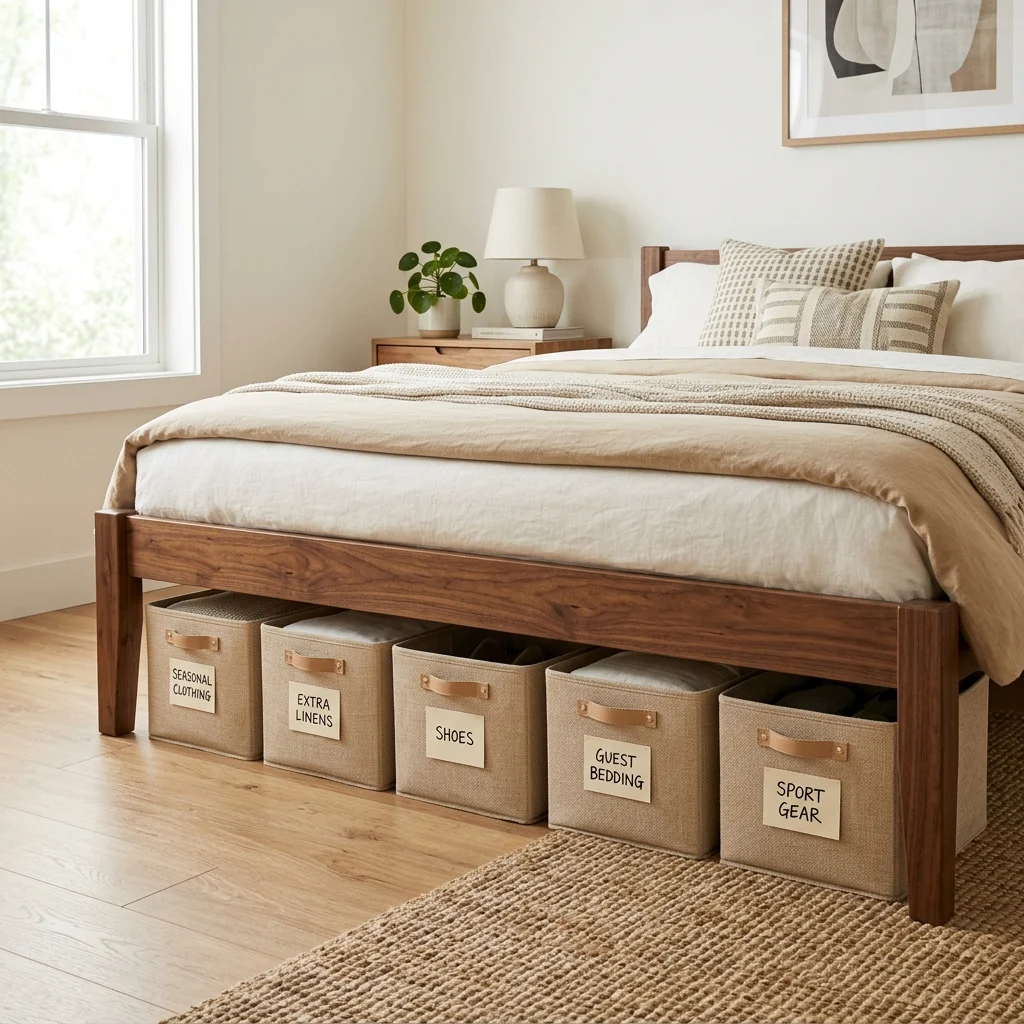
Vibe: The room feels organized, storage hidden in the one zone most rooms waste.
Why it works: Under-bed space is functionally dead storage in most homes because it’s an awkward height and shape for standard shelving, but fitted rolling storage bins turn that same footprint into genuinely usable capacity this is a layout technique, not a purchase, since it requires first measuring your specific bed’s clearance and choosing bins sized to match rather than buying generic ones that either won’t fit or waste height.
How to get it: Measure the exact clearance under your bed frame before buying bins (most beds range from 7 to 14 inches), and choose matching woven or fabric bins with lids rather than open boxes, so the storage stays visually tidy even when the bed skirt is lifted.
Shop the Look
| Product |
| Low-profile rolling storage bin set |
| Under-bed bed risers, adjustable |
| Woven fabric storage bin with lid |
| Label tag set for bins |
| Bed skirt, neutral linen |
16. DIY Fabric-Wrapped Headboard
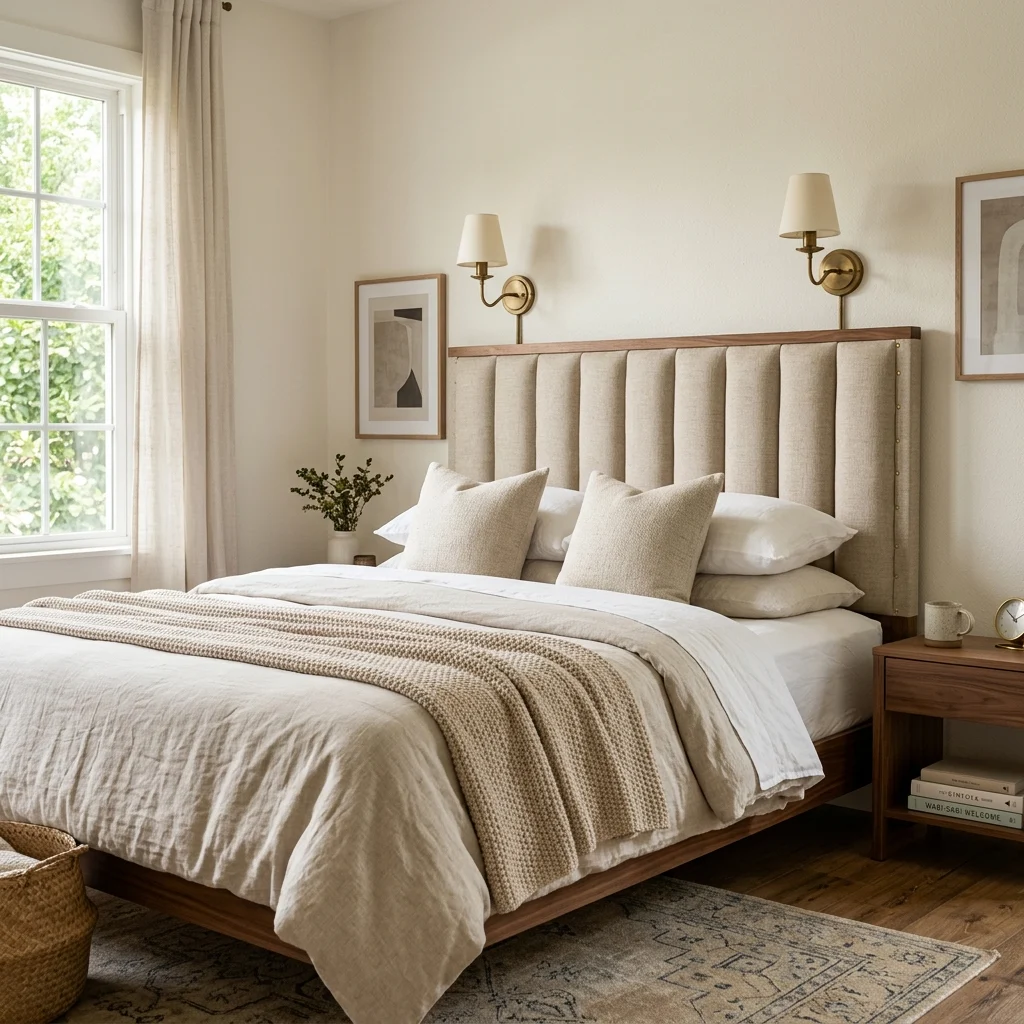
Vibe: The bed feels layered, upholstered softness anchoring the whole wall.
Why it works: A fabric-wrapped headboard, built from a plywood base layered with foam padding and batting before fabric is pulled taut and stapled at the back, delivers the same tufted, upholstered look as a designer headboard costing several times more, because the labor rather than the material is what typically drives headboard pricing. Channel tufting sewn foam ridges creating vertical padded columns adds visual texture without requiring the button-and-thread skill traditional diamond tufting demands.
How to get it: Build channels by sewing simple fabric-and-batting sleeves before wrapping the plywood base, stapling only the flat back panel where staples stay completely hidden once the headboard is mounted.
Shop the Look
| Product |
| Plywood headboard base panel |
| Upholstery foam, high-density |
| Oatmeal linen upholstery fabric |
| Heavy-duty staple gun |
| Brass wall sconce pair |
17. DIY Terracotta Pot Painting for a Cohesive Palette
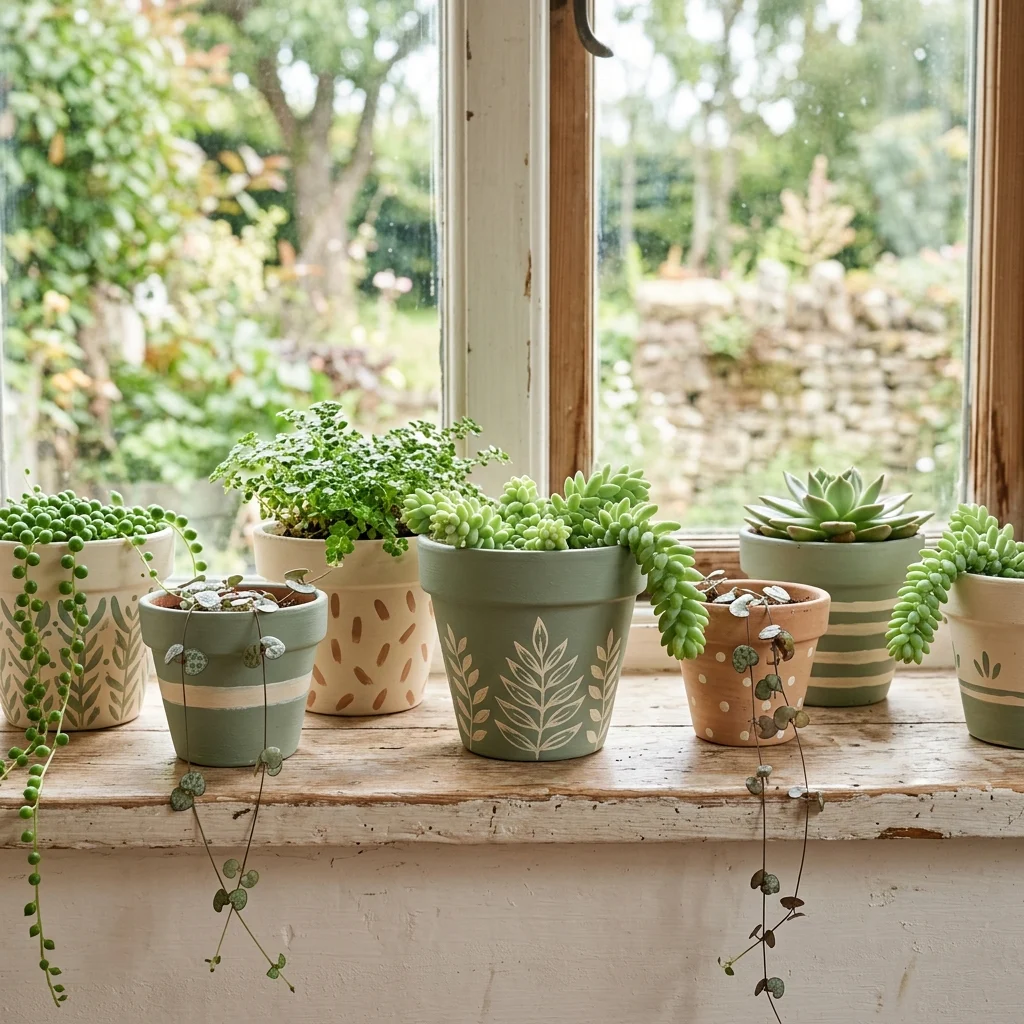
Vibe: The windowsill feels cohesive, mismatched pots pulled into one palette by paint alone.
Why it works: Plain terracotta pots, sold cheaply in nearly any size, become a coordinated collection once painted in a shared two- or three-color scheme, which solves the common problem of accumulating plant pots in mismatched sizes and finishes over time. Acrylic craft paint applied directly to unglazed terracotta absorbs into the porous clay surface rather than sitting on top of it, producing a matte, slightly weathered finish rather than a glossy painted look.
How to get it: Choose two or three colors maximum and assign each consistently to all large pots in sage, all small pots in cream, for instance, so the variety in pot size still reads as one considered collection rather than a random assortment.
💡 Quick Win: A single coat of acrylic paint on unglazed terracotta dries within an hour, making a full windowsill of pots realistically finishable in one afternoon.
Shop the Look
| Product |
| Unglazed terracotta pot set, mixed sizes |
| Acrylic craft paint, sage, and cream |
| Small foam paint roller |
| Clear matte sealant spray |
| Small trailing plant set |
18. DIY Crate Storage Ottoman
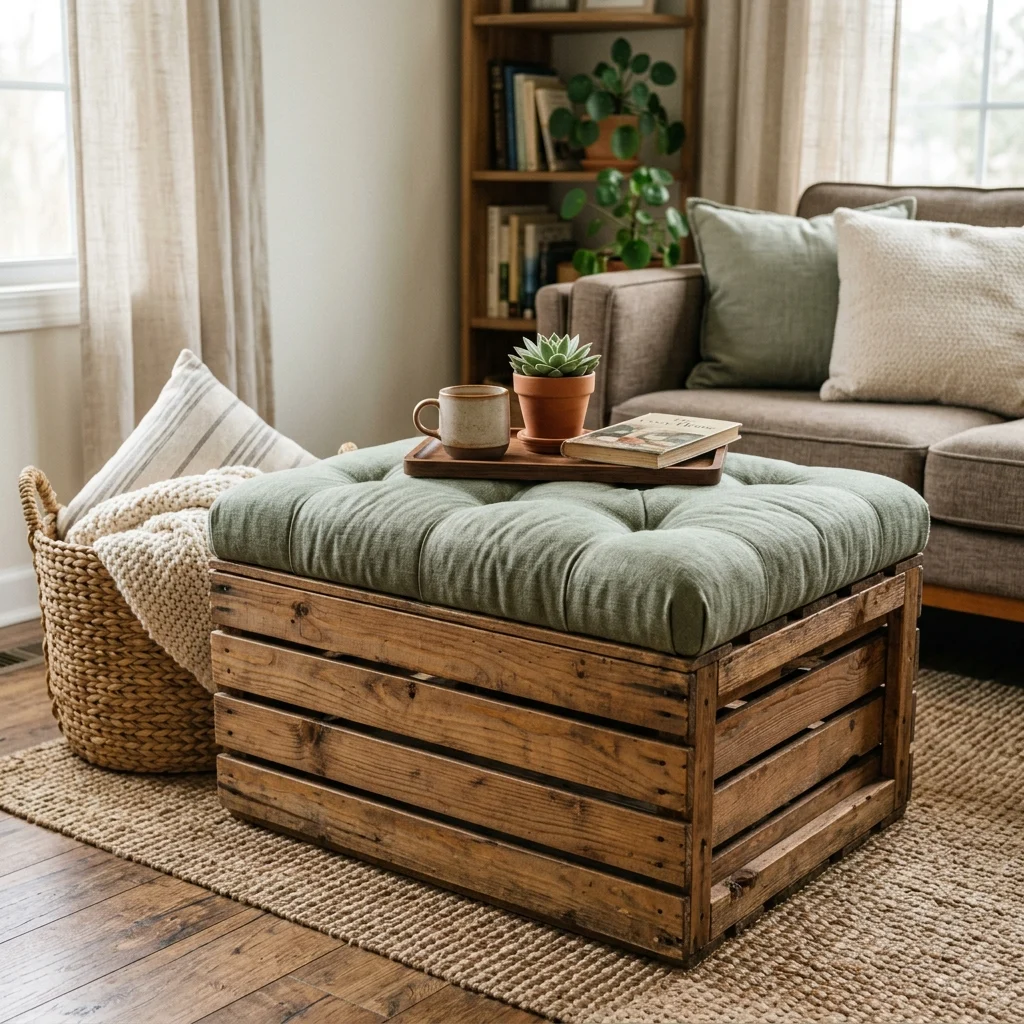
Vibe: The ottoman feels functional, with storage hiding under a genuinely comfortable seat.
Why it works: Building an ottoman from a wooden crate with a hinged, upholstered lid solves two problems in one object: extra seating and enclosed storage using a base structure that requires no complex joinery, since the crate itself already provides the box shape. Attaching the cushioned lid with piano hinges rather than gluing it permanently keeps the storage genuinely accessible, which is the detail that separates a functional ottoman from a purely decorative crate with a cushion balanced on top.
How to get it: Attach the cushioned plywood lid to the crate using a piano hinge along the back edge so it lifts cleanly, and add small furniture pads to the crate’s underside to protect flooring and allow it to slide when needed.
Shop the Look
| Product |
| Wooden storage crate, unfinished |
| Piano hinge, medium length |
| Upholstery foam cushion, cut to size |
| Sage linen upholstery fabric |
| Felt furniture floor pads |
19. DIY String Light Canopy for Ambient Glow
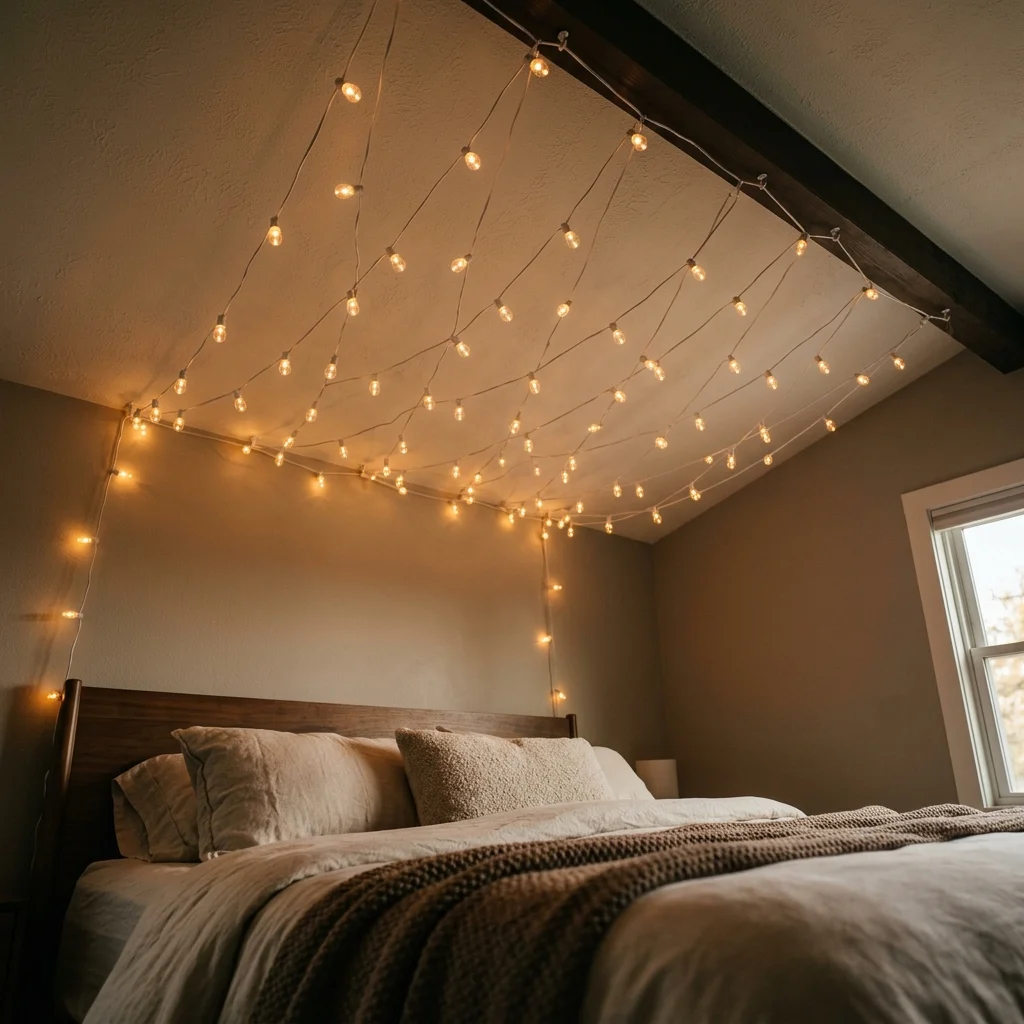
Vibe: The ceiling feels intimate, with warm light draped like a canopy overhead.
Why it works: A string light canopy uses a grid of small ceiling hooks to drape warm LED string lights in soft, evenly spaced arcs across a ceiling area, creating diffused ambient light from above rather than the single hard point-source a normal ceiling fixture produces. This is a genuinely different light-behavior effect than any single lamp achieves, since dozens of small warm points scattered overhead soften shadows throughout the room in a way one bulb cannot.
How to get it: Space ceiling hooks roughly 12–18 inches apart in a grid pattern, and drape the string lights with enough slack between each hook to create a soft sag rather than pulling them taut, which is what produces the canopy’s characteristic gentle curve.
💡 Quick Win: Warm-white LED string lights (2700K, not the cooler white common in holiday lights) are essential; cooler light tones undercut the cozy effect entirely.
Shop the Look
| Product |
| Warm white LED string lights, 2700K |
| Small ceiling cup hooks, pack of 20 |
| Adhesive cable clips for cord management |
| Plug-in dimmer for string lights |
| Neutral linen bedding set |
20. DIY Pressed Botanical Frame Art
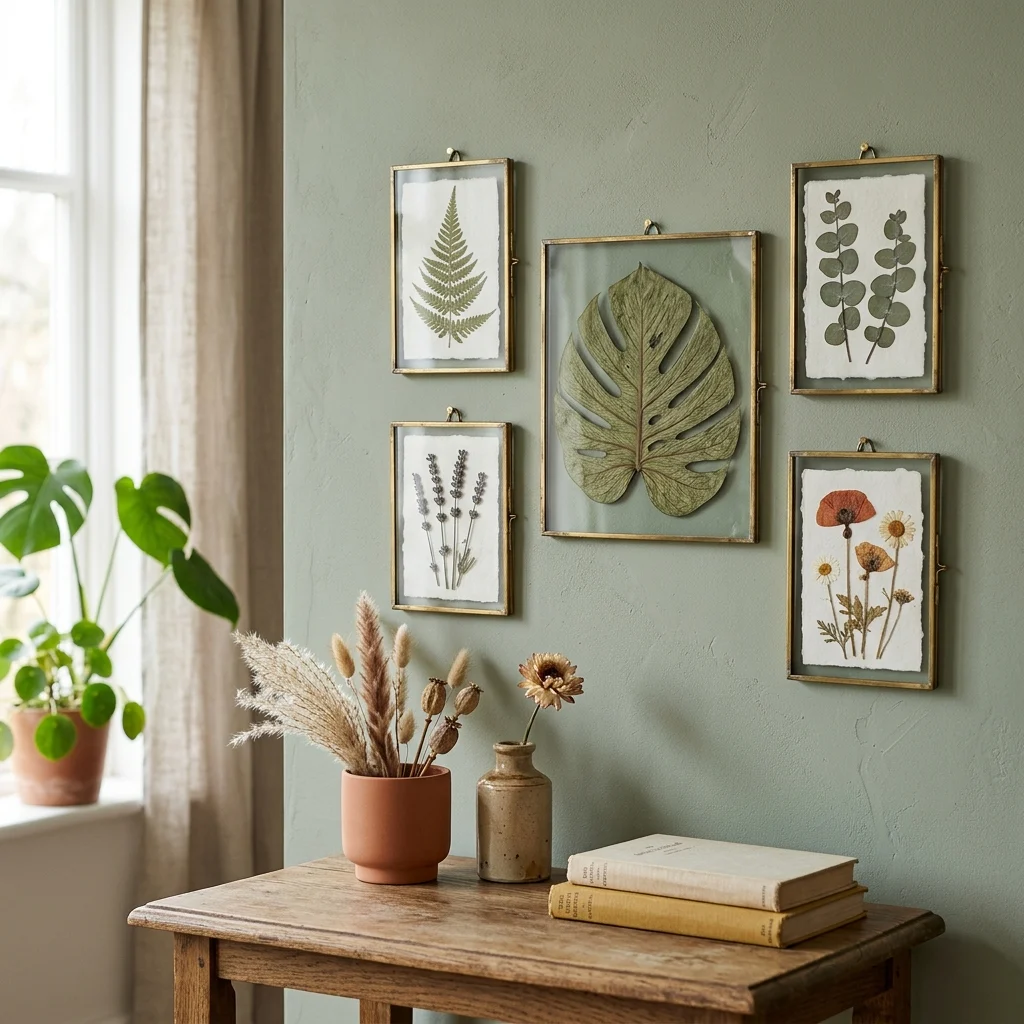
Vibe: The wall feels delicate, real plant material held still behind glass.
Why it works: Pressed botanical art uses actual leaves, ferns, or small flowers flattened and dried under weight for one to two weeks, then mounted between glass and a thin backing, which means every finished piece is genuinely one-of-a-kind in a way that printed botanical art cannot be. No two pressed leaves dry in the same shape or color. This is the same authenticity principle behind other handmade projects on this list, applied to wall art rather than furniture or textiles.
How to get it: Press botanicals between the pages of a heavy book layered with parchment paper for one to two weeks before mounting, choosing flatter specimens like ferns and single flat leaves over bulky flowers, which press unevenly and can mold before fully drying.
Shop the Look
| Product |
| Thin brass botanical frame set |
| Parchment paper for pressing |
| Heavy book or flower press |
| Acid-free mounting paper |
| Small side table |
How to Start Your DIY Home Decor Transformation
Your single first move should be a genuinely no-tool project, such as the no-sew throw pillow covers or the painted terracotta pots, rather than jumping straight into a furniture build, because an early win with visible, fast results is what keeps momentum going into the more involved projects on this list.
The most common mistake beginners make is skipping surface prep, especially on paint and reupholstery projects, painting over dust or grease, or stapling fabric without pulling it taut first. This is specifically why chalk paint makeovers and reupholstered chairs turn out lumpy or peel prematurely; fix it by cleaning every surface thoroughly before painting and always pulling fabric fully taut before securing it, checking for wrinkles as you go rather than after the fact.
Three specific items under $50 that create immediate impact: a quart of chalk paint in sage green for a small furniture piece, a bundle of natural cotton macrame cord for a beginner wall hanging, and a set of warm white 2700K LED string lights for instant ambient glow in any room.
A single-weekend project, pillow covers, painted pots, and a mason jar pendant realistically ccost $15$40 in materials. A more involved build, like a reupholstered chair or a pallet coffee table, runs $50–$150 and generally takes one to two weekends,s including drying and curing time, while a full-room DIY refresh across several projects typically spans four to eight weekends and $300–$700 total.
Frequently Asked Questions About DIY Home Decor
What is the difference between DIY decor and buying pre-made decor?
DIY decor means designing or building the piece yourself using raw materials, paint, and basic tools, while pre-made decor is purchased, finished,d and ready to use. The main tradeoffs are time and customization versus convenience. A DIY reclaimed wood shelf can be built to an exact wall measurement for under $30 in materials, while a comparable store-bought floating shelf in a standard size might cost $40–$80 but requires no building time. Most home decorators mix both approaches, DIY-ing projects where custom sizing or cost savings matter most and buying pre-made where time is the bigger constraint.
What colors work best for DIY home decor projects?
Warm neutrals, such as greige, warm white, and oatmeal, are the easiest colors to work with in DIY projects because they’re forgiving of small application inconsistencies that show up more obviously in saturated colors. Sage green and terracotta are the most common DIY accent colors, both because they pair easily with natural wood tones and because they’re widely available in craft and chalk paint lines like DecoArt. Bold, highly saturated colors are achievable, too, but they show brush strokes and uneven coats more visibly, so they’re better suited to intermediate DIYers than first projects.
How much does it cost to fully decorate a room with DIY projects?
A single weekend project,t like painted terracotta pots or no-sew pillow covers, typically costs $15–$40 in materials. A more involved project, such as a reupholstered chair or a pallet wood coffee table, generally runs $50–$15,0 depending on fabric or wood cost, while a full room built from six to eight DIY projects over several weekends usually totals $300–$700 a meaningful savings compared to furnishing the same room with equivalent store-bought pieces, which can easily run several times that amount.
Can DIY home decor work in a rental apartment?
Yes, and many of the projects on this list are specifically suited to renters. Painted terracotta pots, no-sew pillow covers, macrame wall hangings, and string light canopies require no permanent wall damage and can move with you. For projects like floating shelves or fold-down desks that do require drilling, use removable wall anchors rated for your specific wall type and patch and repaint holes before moving out, which most leases allow as normal wear when done carefully.
What tools do I actually need to start DIY home decor?
A genuinely useful beginner tool kit is smaller than most people expect: a hot glue gun, a basic staple gun, a stud finder, painter’s tape, and a set of angled paintbrushes cover roughly 80% of the projects on this list without needing a drill, saw, or specialized equipment. Projects involving wood cutting or wall-mounted furniture do require a cordless drill and a stud finder specifically, but these are reusable investments; a single $40–$60 cordless drill will carry you through years of future DIY projects beyond this list.
Ready to Create Your Dream DIY Home?
These 20 DIY home decor ideas span color, material, lighting, furniture, and layout from a single color-blocked wall and hand-painted terracotta pots to a full reupholstered chair and a fabric-wrapped headboard, so there’s a real, buildable starting point here, whatever skill level or weekend you have available. You don’t need to tackle every project at once, and starting with one small, low-risk build is exactly how a genuinely handmade home comes together, not a shortcut around the more ambitious pieces waiting further down this list. Today’s specific action: gather the materials for one no-tool project, the no-sew pillow covers or the painted terracotta pots, and finish it this week before moving on to anything requiring a drill or saw. Once a few of these pieces are in place, the room stops feeling assembled from a catalog and starts feeling like proof of what you actually built with your own hands. Save the projects that match your current skill level today, that mason jar pendant, that pallet coffee table, because in DIY decorating, the piece you finish is always better than the one you only planned.
You Might Also Like
- 20 Budget Home Decor Ideas That Actually Look Expensive
- Eco Friendly Bamboo Home Decor: 9 Stunning Ways to Style Every Room
- 10 Stylish Shelf Decor Ideas for Every Room
- Modern Home Decor: 15 Ideas Worth Saving and Stealing
- 13 Minimalist Home Decor Ideas for a Calm, Clutter-Free Space
- 12 Small Space Decor Ideas for a Modern Minimalist Home
[…] 20 DIY Home Decor Ideas You Can Actually Make Yourself […]