
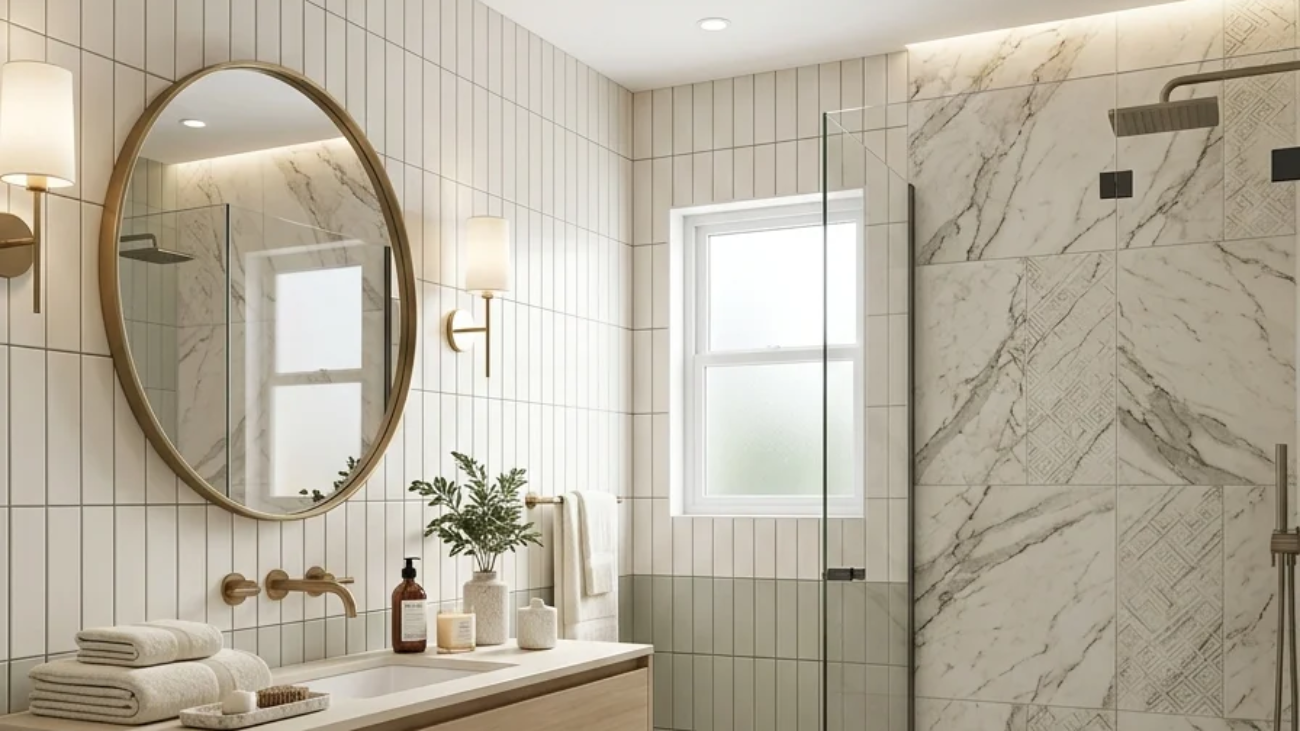
Guest bathroom tile design is the strategic use of pattern, color, and material scale in the smallest room of the house to create maximum visual impact without a full renovation budget. This article offers 15 guest bathroom tile ideas that work in half baths, powder rooms, and small en-suites, regardless of size or layout.
Picture a guest powder room where floor-to-ceiling emerald green zellige catches the vanity light and throws soft green reflections across the mirror, or a half bath where a single wall of scalloped fish-scale tile turns a windowless closet-sized room into the most photographed corner of the house. Guest bathrooms are small enough to gamble on a bold tile choice that would overwhelm a primary bath reads as considered and confident in forty square feet. That permission to be bold, paired with the low material cost of tiling a tiny footprint, is what makes this the one room in the house where a genuinely dramatic tile idea is also a genuinely practical one. Here are 15 ideas worth saving nd stealing.
Why Guest Bathroom Tile Design Works So Well
Guest bathroom tile design is the practice of using a small, low-traffic room as a space for tile choices too bold for a primary bathroom: full-height pattern, saturated color, or an unusual material that would dominate a larger room reads here as a considered, self-contained statement. The idea traces back to the powder room tradition of the Victorian and Edwardian eras, when the smallest room in the house was treated as a jewel box for wallpaper and marble too costly or too intense to use throughout; tile has simply become the contemporary version of that same impulse. What separates it from ordinary small-bathroom design is intent: a guest bath tiled this way is meant to be noticed, not merely finished.
The material and color vocabulary is specific. Handmade zellige, glossy ceramic subway, terrazzo chip flooring, large-format porcelain slab, and scalloped fish-scale tile are the five materials that show up again and again. Color leans saturated and confident: emerald green, ink navy, terracotta blush, warm charcoal, buttercream yellow, and dusty clay pink, rather than the safe greige and white that dominate primary bathrooms used daily by the whole household.
Style at a Glance
| Element | Trait 1 | Trait 2 |
| Philosophy | Small room, bold intentional statement | Tile as a jewel-box moment, not a default finish |
| Materials | Zellige, terrazzo, large-format porcelain, scalloped tile | Glossy subway ceramic, matte penny-round mosaic |
| Color Palette | Emerald green, ink navy, terracotta blush | Warm charcoal, buttercream yellow, dusty clay pink |
1. Wall-to-Wall Zellige in Emerald Green
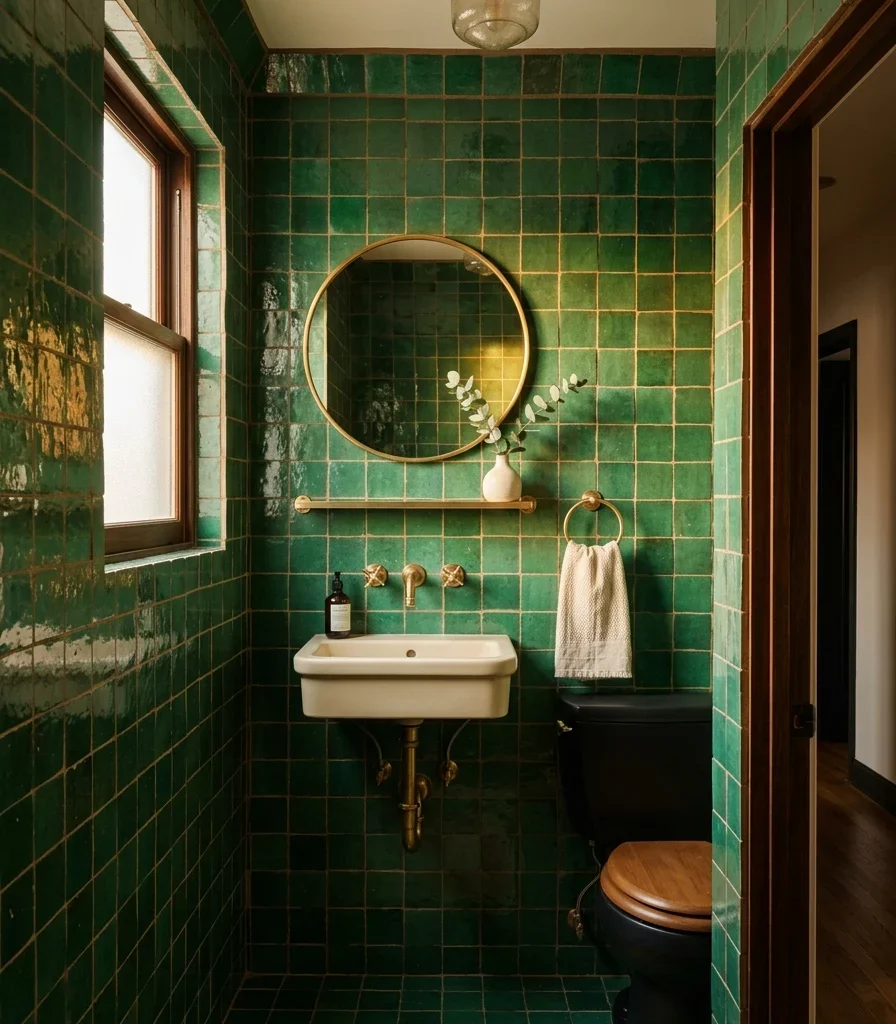
Vibe: This wall feels grounded, like stepping into a small, glazed pool of color the moment the door closes.
Why it works: Zellige is hand-glazed Moroccan clay tile, and no two tiles reflect light the same way, so a single-color wall reads as textured rather than flat, a principle called surface variation. Running it floor-to-ceiling removes any stopping point for the eye, which makes a four-foot-wide room feel enveloping instead of cramped, since there’s no grout break signaling “this is where the small room ends.”
How to get it: Order zellige in 4×4-inch squares and specify a wide grout joint (3/16 inch) in a matching emerald tone so individual tile edges stay visible instead of disappearing into a false single-slab look. Pair with unlacquered brass fixtures, which develop patina alongside the tile’s natural glaze variation over the following years.
💡 Quick Win: Can’t commit to a full wall? Tile just the shower or vanity backsplash in zellige and paint the remaining walls a matched emerald tone; he transition reads intentional, not budget-driven.
Shop the Look
| Product |
| Emerald green zellige tile 4×4 handmade set |
| Unlacquered brass round mirror small |
| Brass single-hook towel bar |
| Ceramic bud vase for eucalyptus stem |
| Emerald tile-matched grout pen for touch-ups |
2. Color-Drenched Terracotta from Floor to Ceiling

Vibe: Warm the kind of small room that feels sun-warmed even without direct light.
Why it works: Color drenching painting or tiling walls, trim, and ceiling in one continuous hue eliminates the visual break where wall meets ceiling, which makes low-ceilinged guest baths feel taller because the eye can’t locate where the room “stops.” Matte terracotta tile also absorbs light rather than bouncing it, which keeps a small room from glaring under a single overhead fixture.
How to get it: Tile the walls in matte terracotta ceramic 3×6 tile and paint the ceiling in a wall paint color-matched as closely as possible to the tile’s exact undertone, a warm, slightly orange terracotta rather than a red-leaning brick tone. Keep the vanity and fixtures in white or unlacquered brass so they read as intentional breaks, not mismatches.
Shop the Look
| Product |
| Matte terracotta ceramic tile 3×6 |
| Terracotta-matched interior wall paint sample |
| Rattan-framed round mirror |
| Small terracotta tabletop planter |
| Cream linen hand towel set |
3. Backlit Tile Niche Above the Vanity

Vibe: Luminous small architectural detail that makes the whole room feel designed rather than furnished.
Why it works: A backlit niche uses light as a material in its own right; the tile inside the recess becomes a lit surface rather than a passive one, softening the harsh shadows a single overhead fixture creates in a windowless guest bath. The niche’s depth also creates negative space, a small architectural pause that keeps a plain vanity wall from reading flat.
How to get it: Frame a 12-inch-deep niche in the vanity wall during a renovation, line it with the same tile used elsewhere in the room for continuity, and run a warm-white (2700K) LED strip along the top edge, hidden behind a small trim lip so the light source itself stays invisible.
💡 Quick Win: No renovation budget? A battery-powered warm LED puck light placed on an existing open shelf against tile creates a similar wash-lit effect for under $20.
Shop the Look
| Product |
| Warm white 2700K LED strip light kit |
| Brushed brass niche edge trim |
| Battery-powered LED puck light set |
| Small glass soap dispenser |
| Waffle-weave washcloth set cream |
4. Large-Format Marble-Look Porcelain Floor

Vibe: Airy floor that makes four square feet read like a proper room instead of a closet.
Why it works: Large-format tile reduces the number of grout lines in a small footprint, and grout lines are what the eye uses to measure a room’s size; fewer lines read as more square footage, even though the floor hasn’t actually changed. Porcelain slab with authentic-looking veining also delivers the visual weight of natural marble at a fraction of the cost, without marble’s porosity problem in a humid room.
How to get it: Specify the largest slab size the room’s dimensions allow, typically 24×48 inches for a guest bath, laid in a simple straight grid rather than a running-bond pattern, which keeps the veining from looking chopped up at the seams. Use a grout color matched closely to the tile’s base tone so the joints nearly disappear.
Shop the Look
| Product |
| Large-format porcelain slab tile marble-look |
| Matched-tone unsanded grout |
| Woven cotton bath mat cream |
| Chrome floor drain cover round |
| White ceramic soap dish minimal |
5. Framed Tile “Art Wall” Behind the Toilet

Vibe: Layered the wall behind the least glamorous fixture in the house made into the room’s actual focal point.
Why it works: Treating a tile panel as framed art rather than a full wall covering applies visual weight distribution; a contained, geometric pattern in a defined rectangle draws the eye to one deliberate focal point, while the rest of the wall stays quiet enough to read as a considered composition rather than a busy surface. Black-and-white encaustic pattern carries enough contrast to work at this small scale.
How to get it: Tile a single rectangular panel roughly 24 by 36 inches centered on the wall directly behind the toilet tank, finish the edge with a thin black metal L-trim, and paint the surrounding wall a plain warm white or cream so the tile panel is the only pattern in the sightline.
💡 Quick Win: Peel-and-stick encaustic-pattern vinyl tile achieves the same framed-panel effect temporarily for renters, at a fraction of the cost and zero demolition.
Shop the Look
| Product |
| Black-and-white encaustic pattern tile set |
| Thin black metal tile edge trim |
| Peel-and-stick encaustic vinyl tile alternative |
| Small brass wall hook single |
| Framed botanical print small |
6. Two-Tone Color-Block Tile Wainscoting

Vibe: Fresh color pairing that feels considered rather than half-finished.
Why it works: Color-block wainscoting divides the wall horizontally between two tones, working with proportion; it typically stops at 40-42 inches, roughly counter height, so the eye reads a deliberate architectural line instead of an arbitrary stopping point. Capping the tile in a contrasting metal trim gives that line the crisp definition a painted-only transition can’t achieve.
How to get it: Tile dusty clay pink 4×4 matte ceramic from the floor to 42 inches, cap the top edge with a brass Schluter trim strip, and paint the wall above in a warm white that carries a hint of the same pink undertone so the two tones relate rather than clash.
Shop the Look
| Product |
| Dusty clay pink matte ceramic tile 4×4 |
| Brass Schluter tile edge trim strip |
| Warm white wall paint sample pink undertone |
| Small round brass-framed mirror |
| Brass towel ring wall mount |
7. Pedestal Sink Against a Full Tile Backdrop
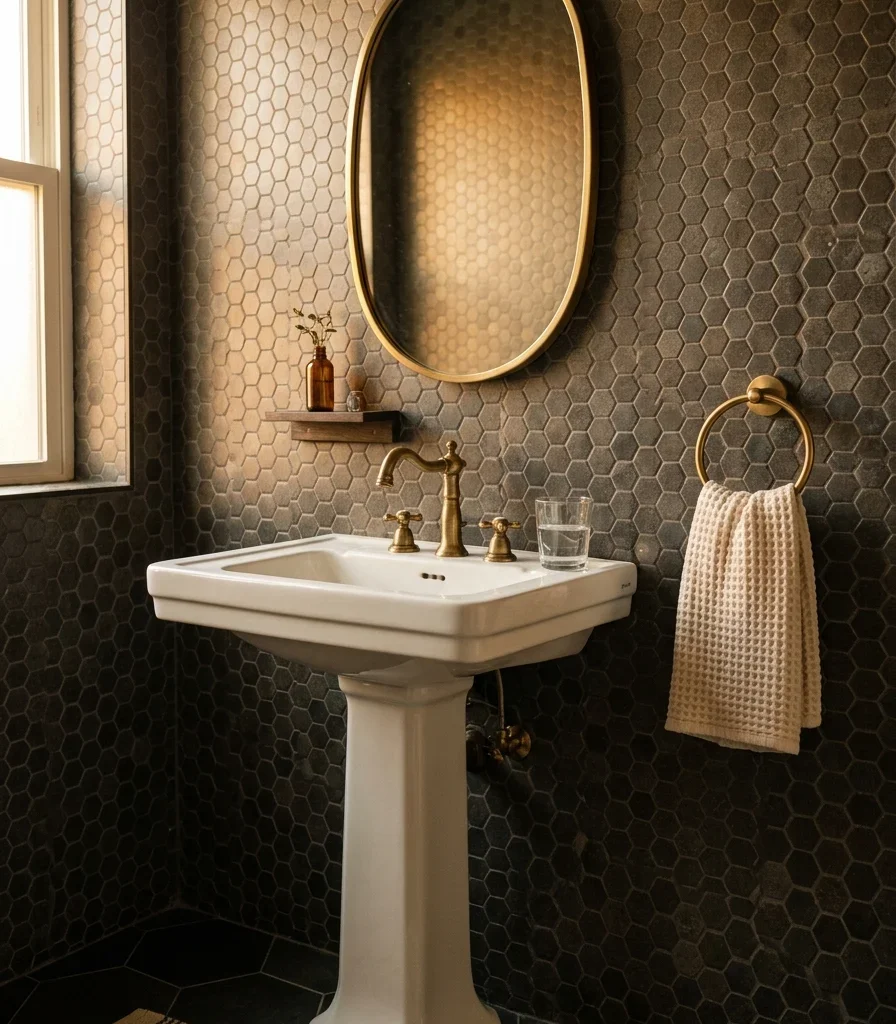
Vibe: Grounded a small fixture that suddenly looks intentional instead of like a placeholder.
Why it works: A pedestal sink has almost no visual mass of its own, so placing it against a fully tiled wall gives it the backdrop weight it lacks alone; borrowed visual weight, where a plain object gains presence from what surrounds it rather than its own scale. Hexagon mosaic in a dark tone also has enough surface texture to read as intentional rather than empty behind a sink with no cabinetry to fill the wall.
How to get it: Tile the entire wall behind and around the pedestal sink in warm charcoal hexagon mosaic sheet tile before installing the sink, so the tile reads continuous rather than tiled-around. Choose a pedestal sink with a slim, modern profile rather than an ornate traditional one, keeping the tile as the visual lead.
💡 Quick Win: If full re-tiling isn’t possible, a large mosaic tile “mat” installed only behind the sink and mirror, roughly 30 by 40 inches, gives most of the same grounding effect.
Shop the Look
| Product |
| Warm charcoal hexagon mosaic tile sheet |
| White modern pedestal sink slim profile |
| Brushed brass single-hole faucet |
| Brass-framed rectangular mirror |
| Brass towel ring wall mount |
8. Wet-Room Layout Defined by a Tile Threshold
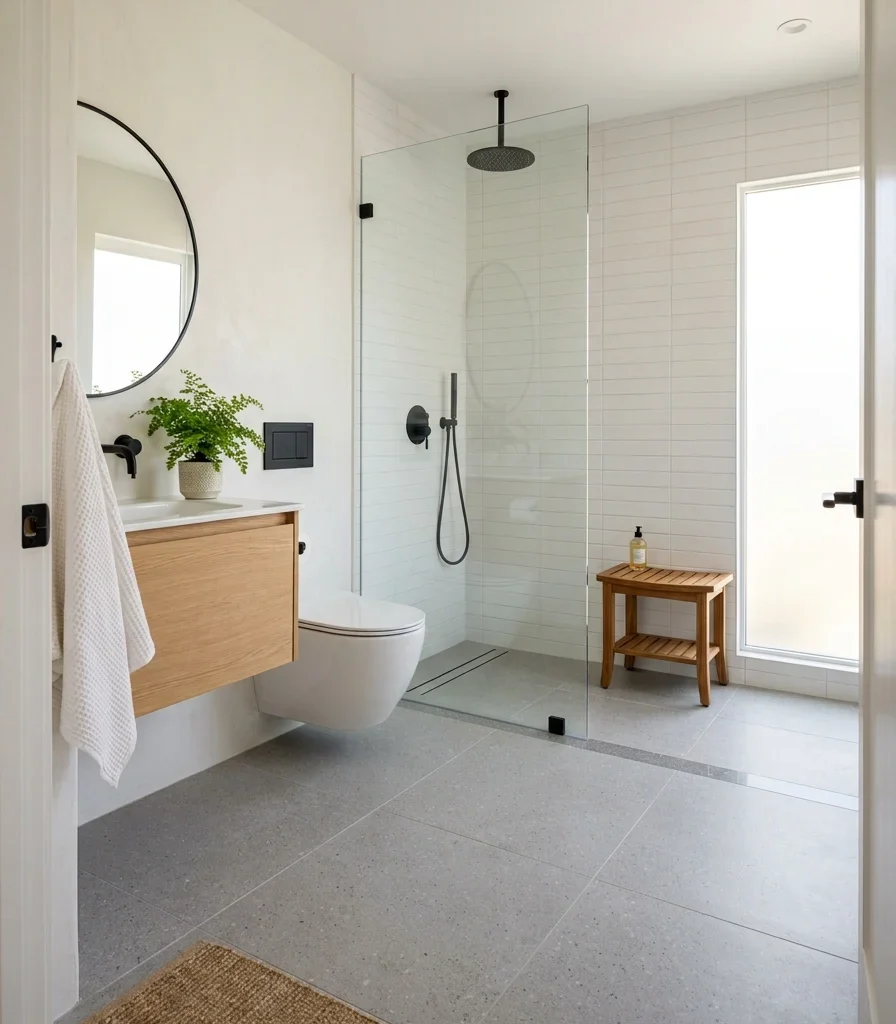
Vibe: Airy, a floor plan that makes a tiny bathroom feel like it has room to move.
Why it works: A curbless wet-room layout removes the barrier of a shower curb, using a continuous plane principle: when the eye sees one uninterrupted floor surface instead of a stepped-up shower pan, the whole room registers as one open volume rather than two divided zones. A single row of contrast tile at the shower’s edge still signals “wet zone starts here” for practical footing without breaking visual continuity.
How to get it: Slope the entire bathroom floor toward a linear drain at the shower’s back wall, tile continuously across both zones in the same large-format tile, and mark the threshold with one narrow row (2-3 inches) of a slightly darker matching tone rather than a raised curb.
Shop the Look
| Product |
| Large-format porcelain floor tile continuous |
| Linear shower drain cover matte black |
| Contrast threshold tile strip narrow |
| Frameless glass shower panel hardware |
| Teak wood shower stool |
9. Handmade Scalloped Fish-Scale Accent Wall

Vibe: Playful, the one wall in the house that makes guests stop and ask where it’s from.
Why it works: Scalloped, or fish-scale, tile shape breaks the strict grid most tile follows, introducing curved negative space between each piece’s texture through shape rather than through material. The overlapping rows also catch light differently at every angle, so the wall visibly shifts in appearance as someone moves through the small room.
How to get it: Install scalloped ceramic tile on a single accent wall only, typically the wall facing the door, since it’s the first surface a guest sees. Start each row from the bottom and overlap upward so curved edges shed water and dust naturally. Choose a glossy glaze over matte, since gloss makes the shape’s dimensional shadow visible.
💡 Quick Win: Scalloped tile is available as a peel-and-stick sheet for renters; apply it to just the wall behind open shelving for the same visual payoff without adhesive tile setting.
Shop the Look
| Product |
| Buttercream yellow scalloped ceramic tile sheet |
| Peel-and-stick scalloped tile alternative |
| Small brass wall sconce single arm |
| Ceramic bud vase small |
| Dried flower stem single |
10. Wall Sconces Mounted Directly on Tile
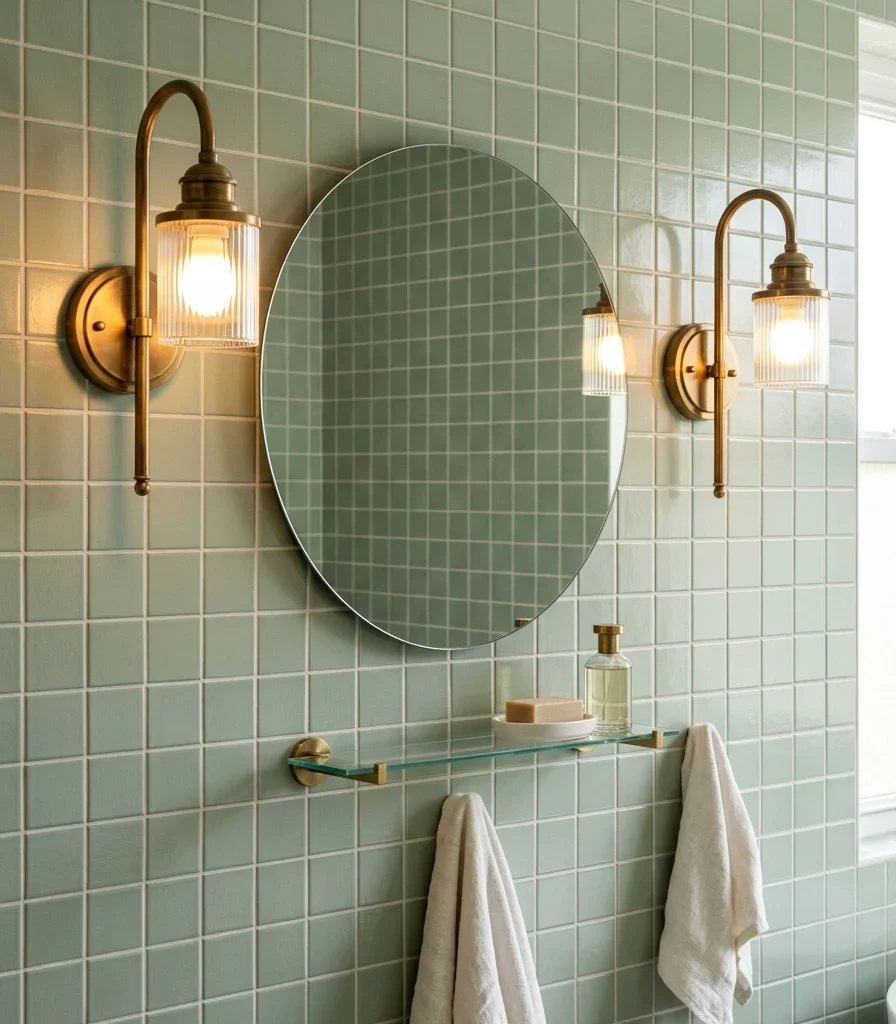
Vibe: Serene, a lighting choice that treats the tile wall as a finished surface rather than something to work around.
Why it works: Mounting sconces directly on tile rather than on drywall beside the mirror keeps the light source integrated into the same plane as the wall’s texture, avoiding the visual interruption of a fixture floating on an unrelated surface. Flanking sconces at eye level also solve the shadow problem overhead lighting creates in small rooms, casting even, forward-facing light instead of downward shadows.
How to get it: Plan sconce electrical boxes before tiling, positioning them 60-66 inches from the floor and roughly 30-36 inches apart, then tile around the box openings so the sconce mounts flush against the finished surface. Choose sconces with a slim arm profile that doesn’t compete with the tile pattern behind it.
Shop the Look
| Product |
| Brass wall sconce pair flush mount |
| Sage green ceramic tile 4×4 |
| Round unframed bathroom mirror |
| Small floating glass shelf |
| Ceramic soap dish minimal |
11. Moody Ink-Navy Tile for a Dramatic Powder Room
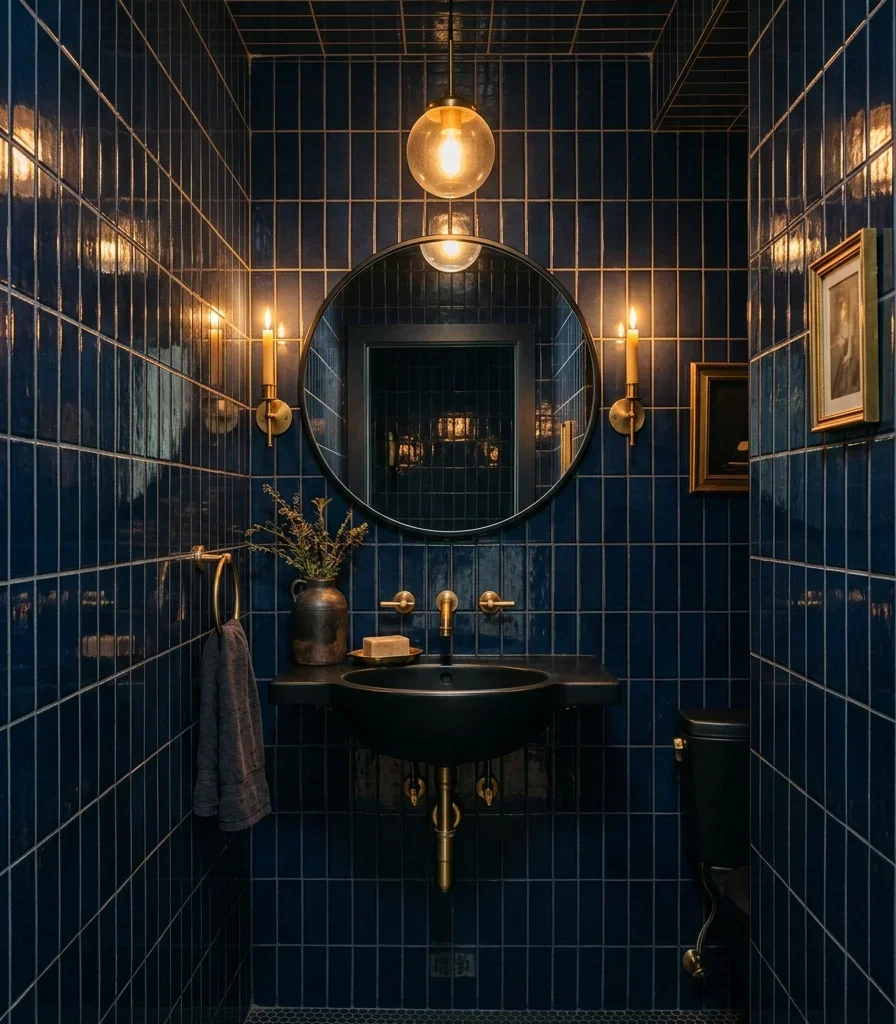
Vibe: Moody a small room that trades brightness for drama and comes out ahead.
Why it works: Dark, saturated color in a small room contradicts the assumption that small spaces need light colors to feel larger. Deep ink navy absorbs the room’s edges into shadow, so walls seem to recede rather than close in, a principle called boundary dissolution. Glossy tile is essential here rather than matte, since gloss bounces available light back into the room and keeps dark color from reading flat.
How to get it: Tile all four walls floor-to-ceiling in glossy navy ceramic 3×6 tile, and commit to at least one genuine light source beyond the overhead fixture a wall sconce or small pendant since dark tile lit only by a single flush-mount ceiling light reads cave-like rather than intentional.
💡 Quick Win: Test the commitment first with a peel-and-stick navy tile backsplash behind just the sink before tiling the full room.
Shop the Look
| Product |
| Glossy ink navy ceramic tile 3×6 |
| Brass taper candle wall sconce |
| Small pendant light black and brass |
| Black-framed rectangular mirror |
| Small dark ceramic decorative vessel |
12. Open Tile Niche Shelving for Display
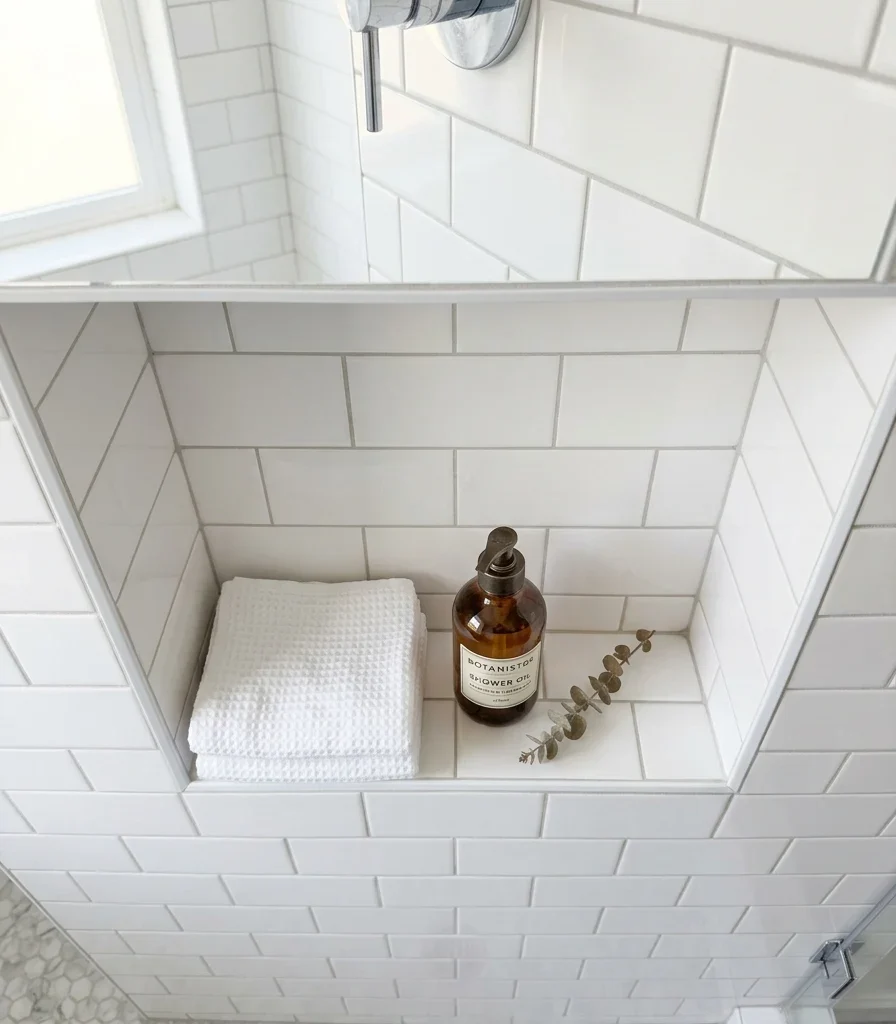
Vibe: Clean storage that behaves like styling rather than clutter.
Why it works: A recessed tile niche solves the small-bathroom storage problem without adding visual bulk the way a surface-mounted shelf or cabinet would; it borrows depth from inside the wall cavity rather than the room’s floor area, a technique of negative-space storage. Tiling the interior in the same material as the surrounding wall keeps it from reading as a separate add-on.
How to get it: Frame the niche between wall studs at a depth of 4 inches, line the interior with the same tile as the shower wall, and finish with a single thin stone or tile shelf ledge rather than multiple shelves, keeping the amount displayed deliberately limited.
Shop the Look
| Product |
| White subway tile matching shower wall |
| Thin marble niche shelf ledge |
| Amber glass soap dispenser bottle |
| White waffle-weave washcloth stack |
| Small dried branch stem |
13. Floating Vanity with Full-Height Tile Surround
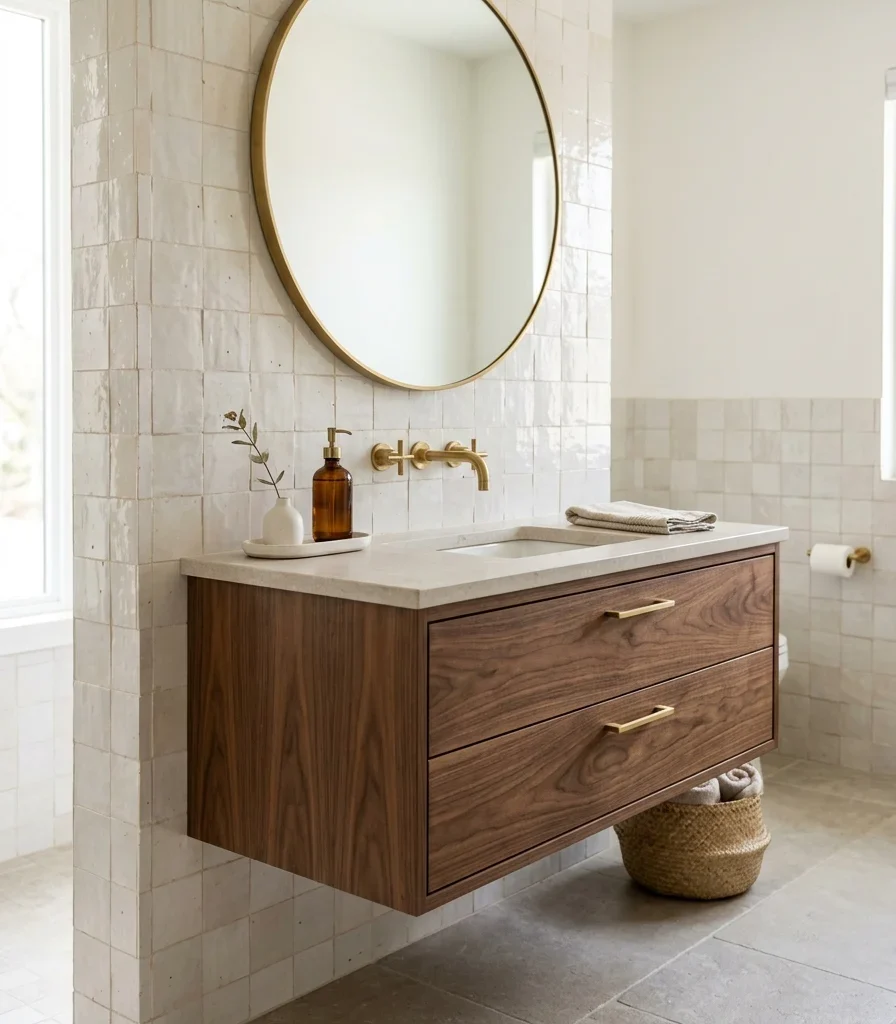
Vibe: Airy, a vanity that seems to hover instead of sitting heavy on the floor.
Why it works: A floating vanity leaves the floor visible beneath it, which is the single most effective furniture trick for a small bathroom, since visible floor space reads as more square footage than the same room with a floor-to-cabinet vanity blocking the sightline. Backing it with full-height tile gives the floating piece a grounded anchor above so the room doesn’t feel unfinished despite the open gap below.
How to get it: Mount the vanity 4-6 inches off the floor on a concealed wall bracket rated for its full loaded weight, and tile the entire wall behind it floor-to-ceiling before installation so there’s no visible seam where the vanity meets the wall.
💡 Quick Win: Choose a vanity in a warm wood tone like walnut or white oak rather than painted MDF; the grain adds a second natural texture that pairs with handmade tile without competing with it.
Shop the Look
| Product |
| Floating walnut bathroom vanity wall-mount |
| Warm white zellige tile 4×4 |
| Concealed wall-mount vanity bracket |
| Brass single-hole faucet |
| Small ceramic vanity tray |
14. Vertical Tile Stripes to Stretch a Narrow Room
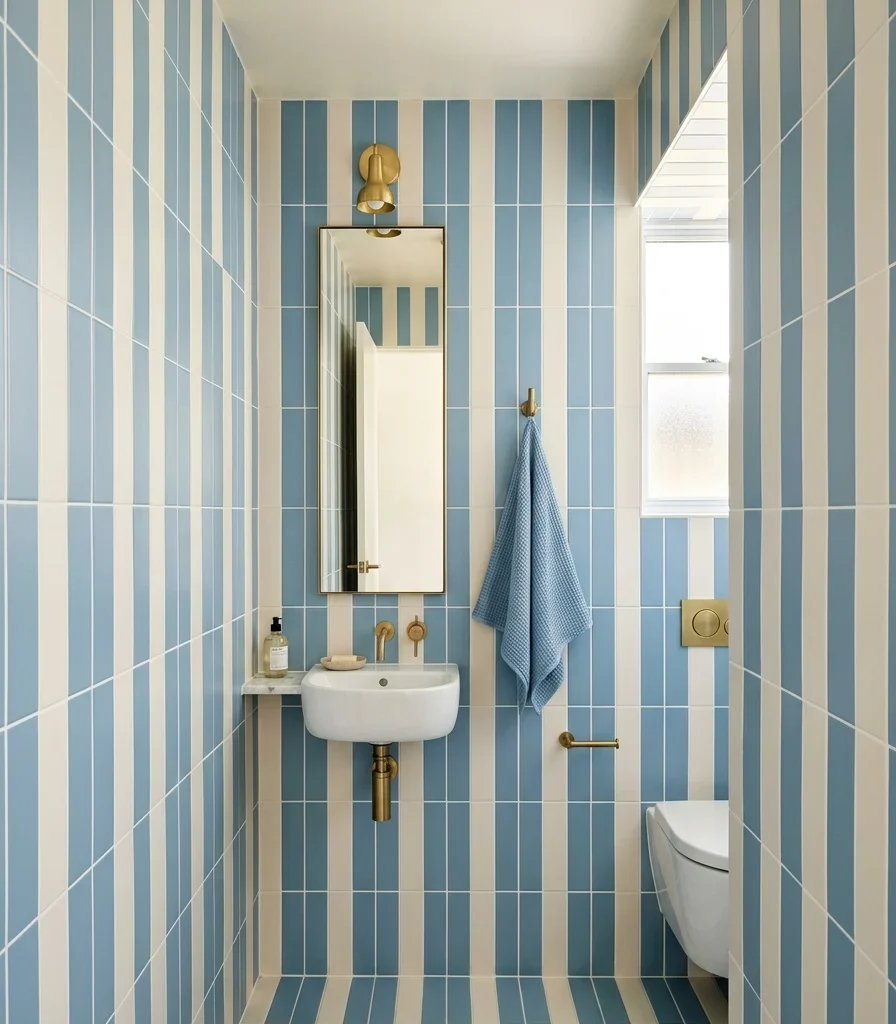
Vibe: Elongated a trick that makes a room feel a foot taller without moving a single wall.
Why it works: Vertical lines are the oldest illusion technique in small-space design because the eye follows a line’s direction; alternating tile stripes pull the gaze upward toward the ceiling, making a room with low ceilings or a narrow footprint register as taller than its actual dimensions. Keeping stripe width narrow, around 6 inches, and contrast soft rather than high prevents the effect from feeling like a barcode.
How to get it: Install 3×12 tile in two alternating tones; a warm white and a soft dusty blue work well together, running each stripe floor to ceiling with matching narrow grout lines, and hang a tall, slim mirror rather than a round one to continue the vertical emphasis.
💡 Quick Win: If full tiling isn’t in the budget, apply the same vertical-stripe logic with paint alone,e masking tape stripes in two tones to achieve most of the elongating effect.
Shop the Look
| Product |
| Warm white ceramic tile 3×12 |
| Dusty blue ceramic tile 3×12 matching |
| Slim vertical wall mirror |
| Brass single towel hook |
| Painter’s tape for stripe masking alternative |
15. Herringbone Floor Tile to Define the Wet Zone
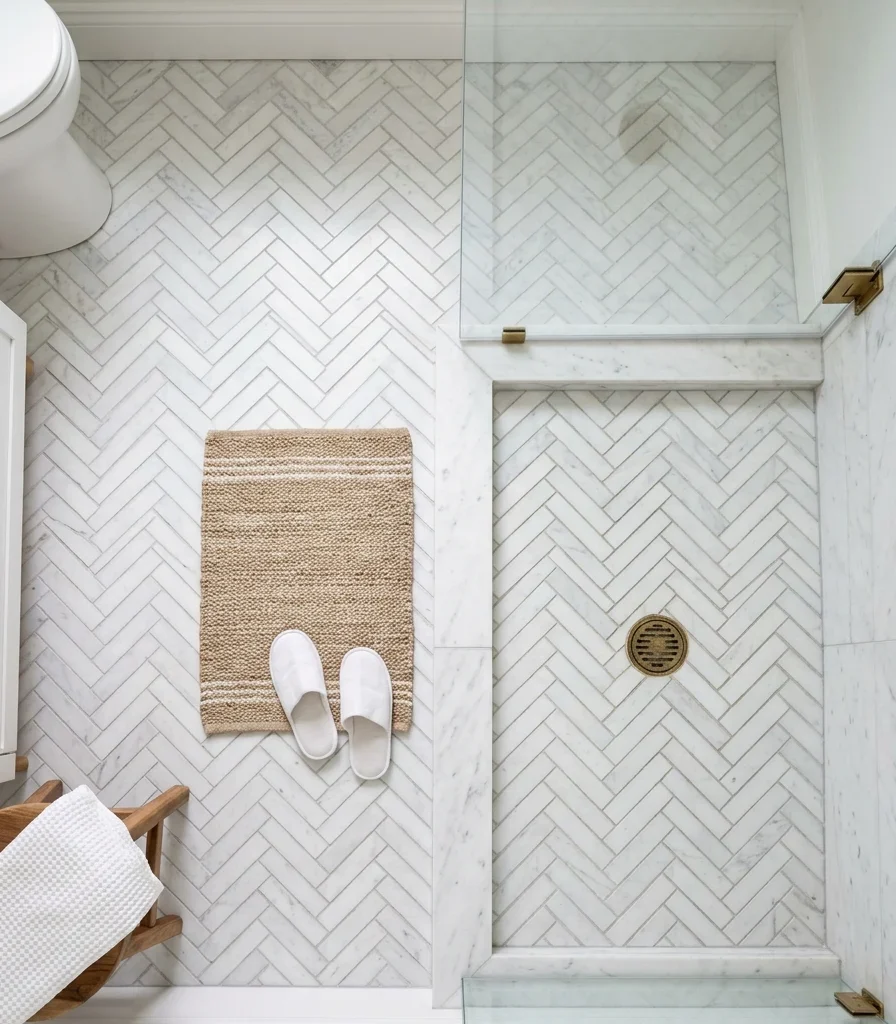
Vibe: Refined floor pattern that quietly organizes the room without a single wall or curb.
Why it works: Herringbone’s diagonal, interlocking pattern creates a sense of movement across the floor, and shifting the pattern’s direction from a straight herringbone in the main floor area to a diagonal herringbone inside the shower zone uses pattern change instead of a physical barrier to mark where one zone ends and another begins. This zone definition through pattern keeps a curbless small bathroom open while staying visually organized.
How to get it: Lay 1×3-inch marble mosaic tile in a standard herringbone pattern across the main floor, then rotate the same tile 45 degrees within the shower area only, so the direction change reads as deliberate rather than a mistake. Keep the grout color consistent throughout so tile color, not grout, carries the visual distinction.
Shop the Look
| Product |
| White marble herringbone mosaic tile sheet |
| Matching unsanded grout consistent tone |
| Brass round floor drain cover |
| Woven cotton bath mat small |
| Marble threshold saddle strip |
How to Start Your Guest Bathroom Tile Transformation
Start with the shower or vanity backsplash tile, then the paint color, not the fixtures. Pick one tile, one specific material, color, and shape, for that single surface first, because every other decision in a guest bathroom wall paint undertone, metal finish, mirror shape should complement that one tile rather than the reverse. Committing to zellige in emerald green, for instance, immediately rules out competing bold colors elsewhere and tells you the fixtures should be brass, not chrome.
The most common mistake is choosing a tile pattern or color at true room scale without seeing a large enough sample; a single tile chip in a showroom looks nothing like sixteen square feet of that same tile under the room’s actual lighting, and bold colors especially can read far darker or more saturated once installed. Fix this by ordering a minimum 12×12-inch sample board and viewing it in the actual bathroom, under actual lighting, at both day and night, before finalizing the order.
Three items under $50 that create immediate impact: a single sheet of peel-and-stick scalloped or hexagon tile ($25-$40) applied to one small accent wall or niche; a brass towel ring or single-arm wall hook ($15-$30) that upgrades hardware to match a future tile choice; and a 12×12-inch tile sample board ($10-$25) ordered directly from a supplier to test color and light before committing.
A single accent wall or backsplash project is a genuine weekend job for a confident DIYer and typically costs $200-$600 in materials for a guest bathroom’s small footprint. A full floor-to-ceiling tile transformation of walls and floor runs $1,500-$4,000 depending on material; handmade zellige and scalloped tile sit at the top of that range, and takes a professional installer 3-5 days, including setting and grout curing. Because guest bathrooms are small, even the full-room version stays one of the most affordable single-room renovations in the house.
Frequently Asked Questions About Guest Bathroom Tile Ideas
What’s the difference between guest bathroom tile and powder room tile?
The terms overlap heavily and are often used interchangeably, but “powder room” technically refers to a bathroom with no shower or tub, just a toilet and sink, while “guest bathroom” can include a full bath with a shower used by visitors. This distinction matters for tile choice: a powder room’s tile only needs to handle occasional splashing, so more delicate or highly patterned tile like scalloped ceramic or encaustic cement tile becomes practical there in a way it wouldn’t inside a daily-use shower. A guest bath with a shower needs its wet-zone tile, typically porcelain or ceramic rated for continuous water exposure, while the dry-zone walls keep the same creative freedom as a powder room.
What tile color makes a small guest bathroom look bigger?
Counterintuitively, a single saturated color run floor-to-ceiling, like ink navy or emerald green, often makes a small guest bathroom feel larger than a light neutral tile stopped partway up the wall, because the continuous color removes the visual break where the eye would otherwise measure the room’s actual small size. If a lighter approach is preferred, warm white or soft sage with minimal grout lines using large-format tile achieves a similar effect while staying in a brighter palette. What consistently makes a small bathroom look smaller is a mix of several competing tile colors or an overly busy small-scale pattern used everywhere at once.
How much does it cost to retile a small guest bathroom?
A full guest bathroom retiling project walls and floor in a room roughly 5×8 feet typically costs between $1,500 and $4,000 i, including materials and professional labor, with the wide range driven mostly by tile material choice: standard ceramic subway tile sits at the lower end, while handmade zellige, scalloped tile, or natural stone push toward the upper end. A single accent wall or backsplash-only project runs $200-$800. Labor typically makes up 40-60% of the total cost, so a DIY accent wall project is where the biggest savings are available for anyone comfortable with basic tile setting.
Does bold tile in a guest bathroom clash with a neutral home?
A bold guest bathroom tile choice generally reads as more compatible with a neutral home than a bold choice in an open-plan living space, precisely because the bathroom is a fully enclosed, self-contained room with a door; the color commitment doesn’t need to visually connect to adjacent rooms the way a kitchen or living room tile choice would. The one compatibility detail worth checking is metal finish: matching the guest bathroom’s fixture finish (brass, matte black, chrome) to the finishes used elsewhere in the home keeps the bold-tile room feeling like a deliberate extension of the house’s style rather than an unrelated space.
What grout color should I use with patterned or colored tile?
For colored tile like zellige, terracotta, or navy ceramic, matching the grout as closely as possible to the tile’s own tone is the most reliable choice; it minimizes the grid pattern and lets the tile color read as one continuous surface rather than a checkerboard of small pieces. For pattern tile like encaustic or herringbone marble, a grout in a neutral tone one or two shades darker than the tile’s lightest color usually defines the pattern clearly without overpowering it. White grout is rarely the right choice with colored or handmade tile, since the high contrast draws attention to every grout line rather than the tile itself.
Ready to Create Your Dream Guest Bathroom Tile Look?
These 15 guest bathroom tile ideas move across the full range of what this small room can do: saturated color drenching, handmade material texture, layout tricks that stretch a narrow room, and lighting that turns a plain tile wall into something genuinely considered. A guest bathroom transformation doesn’t need to happen all at once, and picking just one wall, one niche, or one accent detail to start with is a completely legitimate way to begin. Today, order a 12×12-inch sample board of the tile color that pulled at you the most from this list and hold it against the room’s actual wall in daylight and lamp light before anything else. Once the tile is in and the room is finished, the payoff isn’t just visual; it’s the small, private satisfaction of a guest walking into the smallest room in the house and stopping to look twice. Save the ideas that matched the tile you kept scrolling back to, and start with the one square foot that convinced you first.